Hello all! I’m Shavonne from Once Upon a Bungalow. Here with another fun How-to. Bringing spring indoors is one of the easiest ways to brighten your home during colder months, and it’s fun to make, too! A mixed bulb planter filled with hyacinths, paperwhites, and daffodils creates layers of colour, fragrance, and texture—all in one container. Follow this detailed step-by-step guide to create a lush, thriving indoor spring display.
Step One: Choose the Right Container
Start with a large, shallow bowl or planter that preferably has drainage holes. If your bowl doesn’t have drainage, like the one I chose, add a layer of pebbles at the bottom to help prevent water from sitting around the roots. A wide container allows you to layer multiple bulbs for a fuller, more visually appealing arrangement.
Step Two: Use Quality Soil for Strong Growth
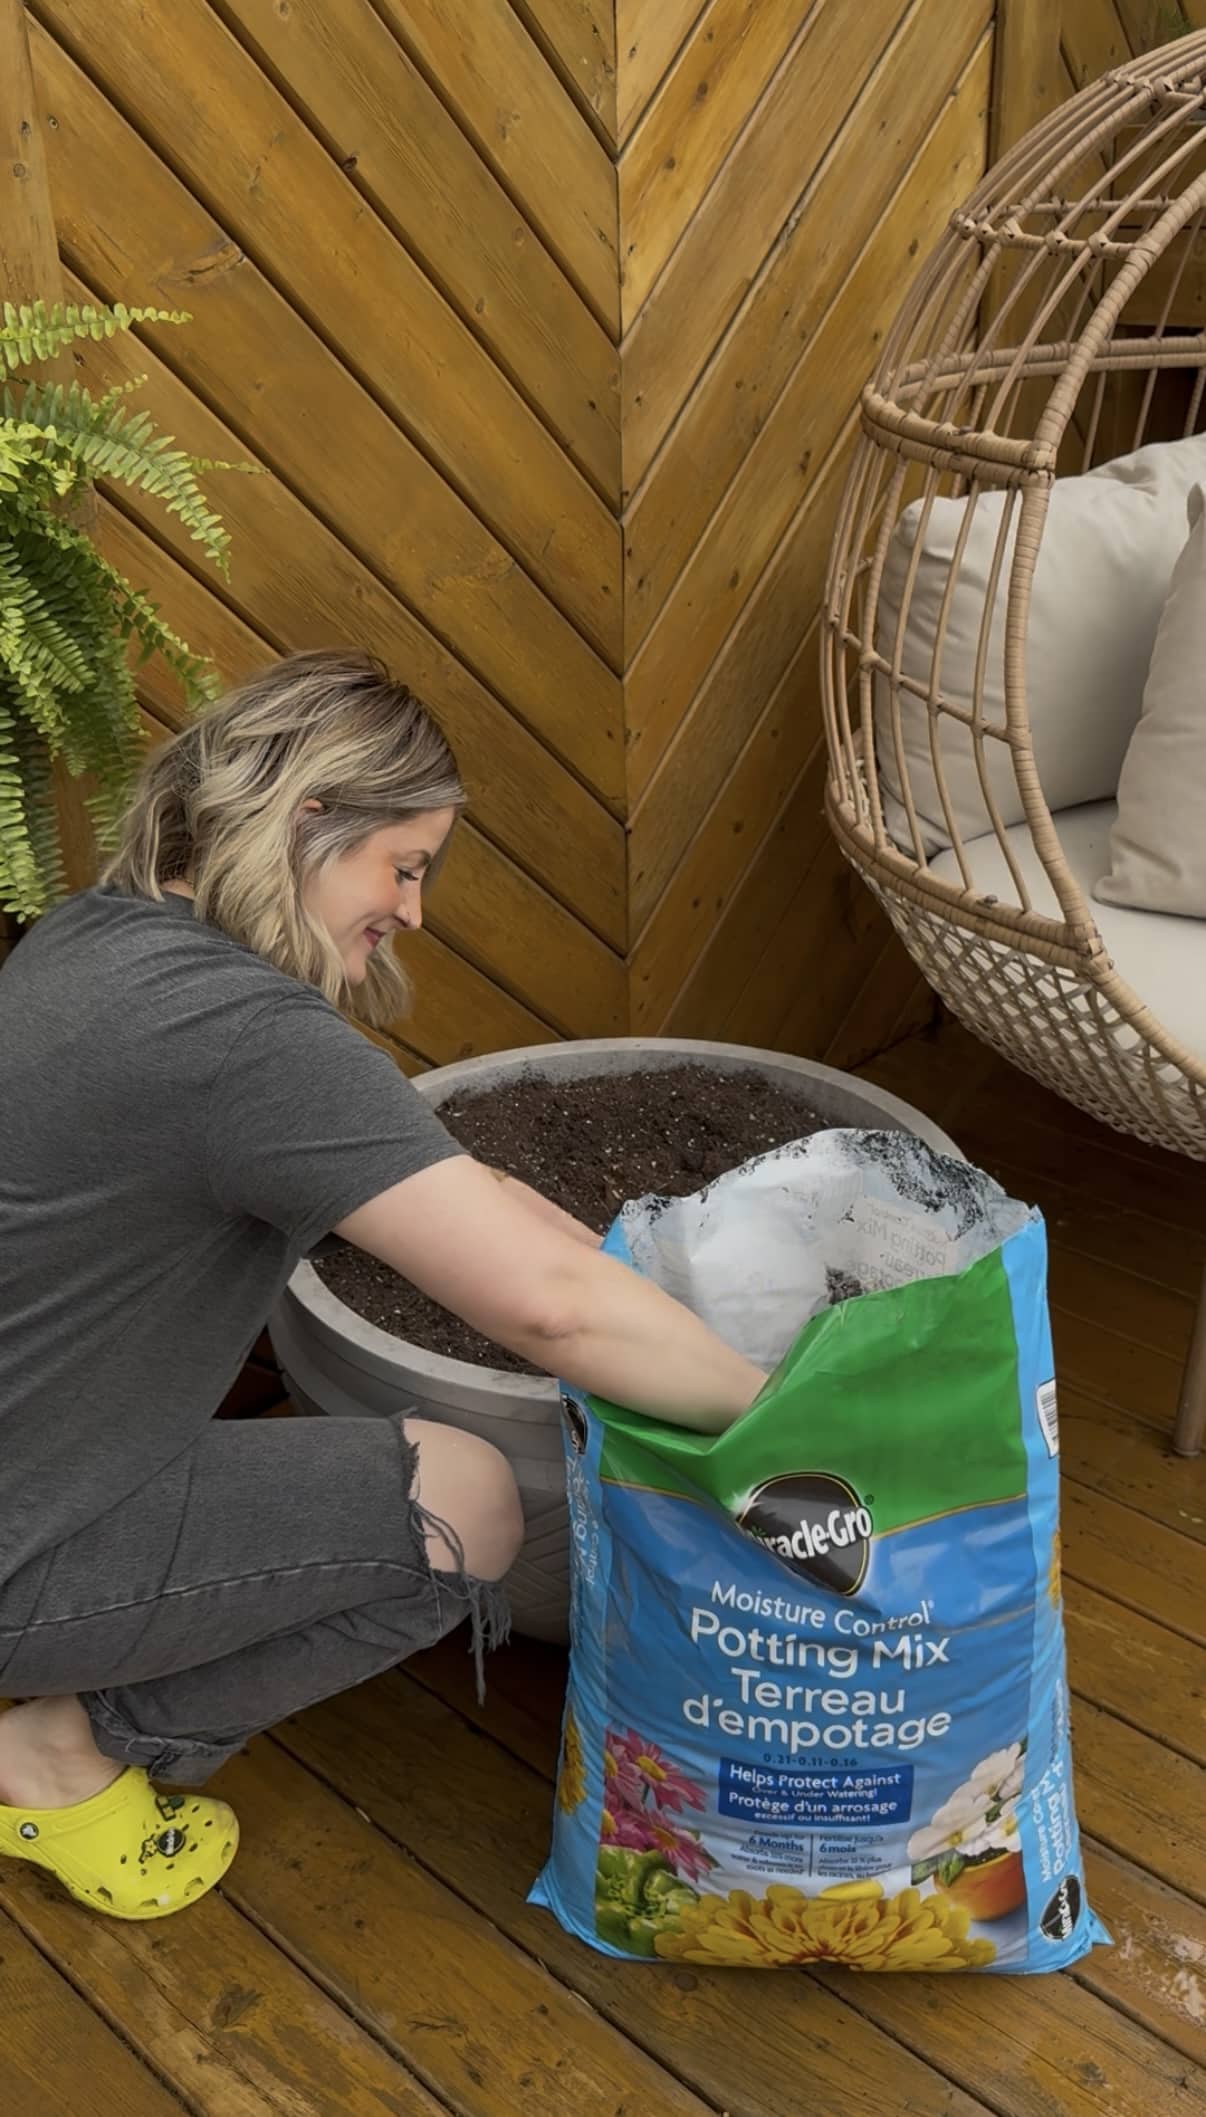
Fill your container about halfway with a high-quality indoor potting mix. I chose Miracle-Gro® Indoor Potting Mix. This type of soil is specially formulated to:
Provide excellent drainage while retaining just enough moisture
Reduce the risk of fungus gnats (a common indoor issue)
Deliver essential nutrients that support early root development
Using a premium mix gives your bulbs the best possible start and helps ensure healthy, vibrant blooms.
Step Three: Arrange Your Bulbs Thoughtfully
When planting a mixed bulb arrangement, placement matters for both aesthetics and growth timing.
Daffodils (tallest): Place these toward the center or back. They will grow the tallest and create structure.
Hyacinths (mid-height): Arrange around the daffodils. Their dense blooms and strong fragrance add fullness.
Paperwhites (flexible height): These can be placed throughout, but often look best clustered for a natural look.
Position bulbs close together, but not touching. Unlike outdoor planting, indoor arrangements benefit from a tighter, more abundant look.
Step Four: Plant at the Proper Depth
Add more soil around the bulbs, leaving the top third of each bulb exposed.
Hyacinths: Plant with the pointed tip facing up. They prefer to sit slightly above the soil line.
Paperwhites: These can be planted shallowly, with much of the bulb exposed. They root quickly and easily.
Daffodils: Plant a bit deeper than the others, but still leave the tip visible.
Firm the soil gently around the bulbs to secure them in place. Once the bulbs were planted at the desired location, I added moss around each bulb and embellished the arrangement with curly willow, sticks, and some faux birds.
Step Five: Water Thoroughly (But Don’t Overdo It)
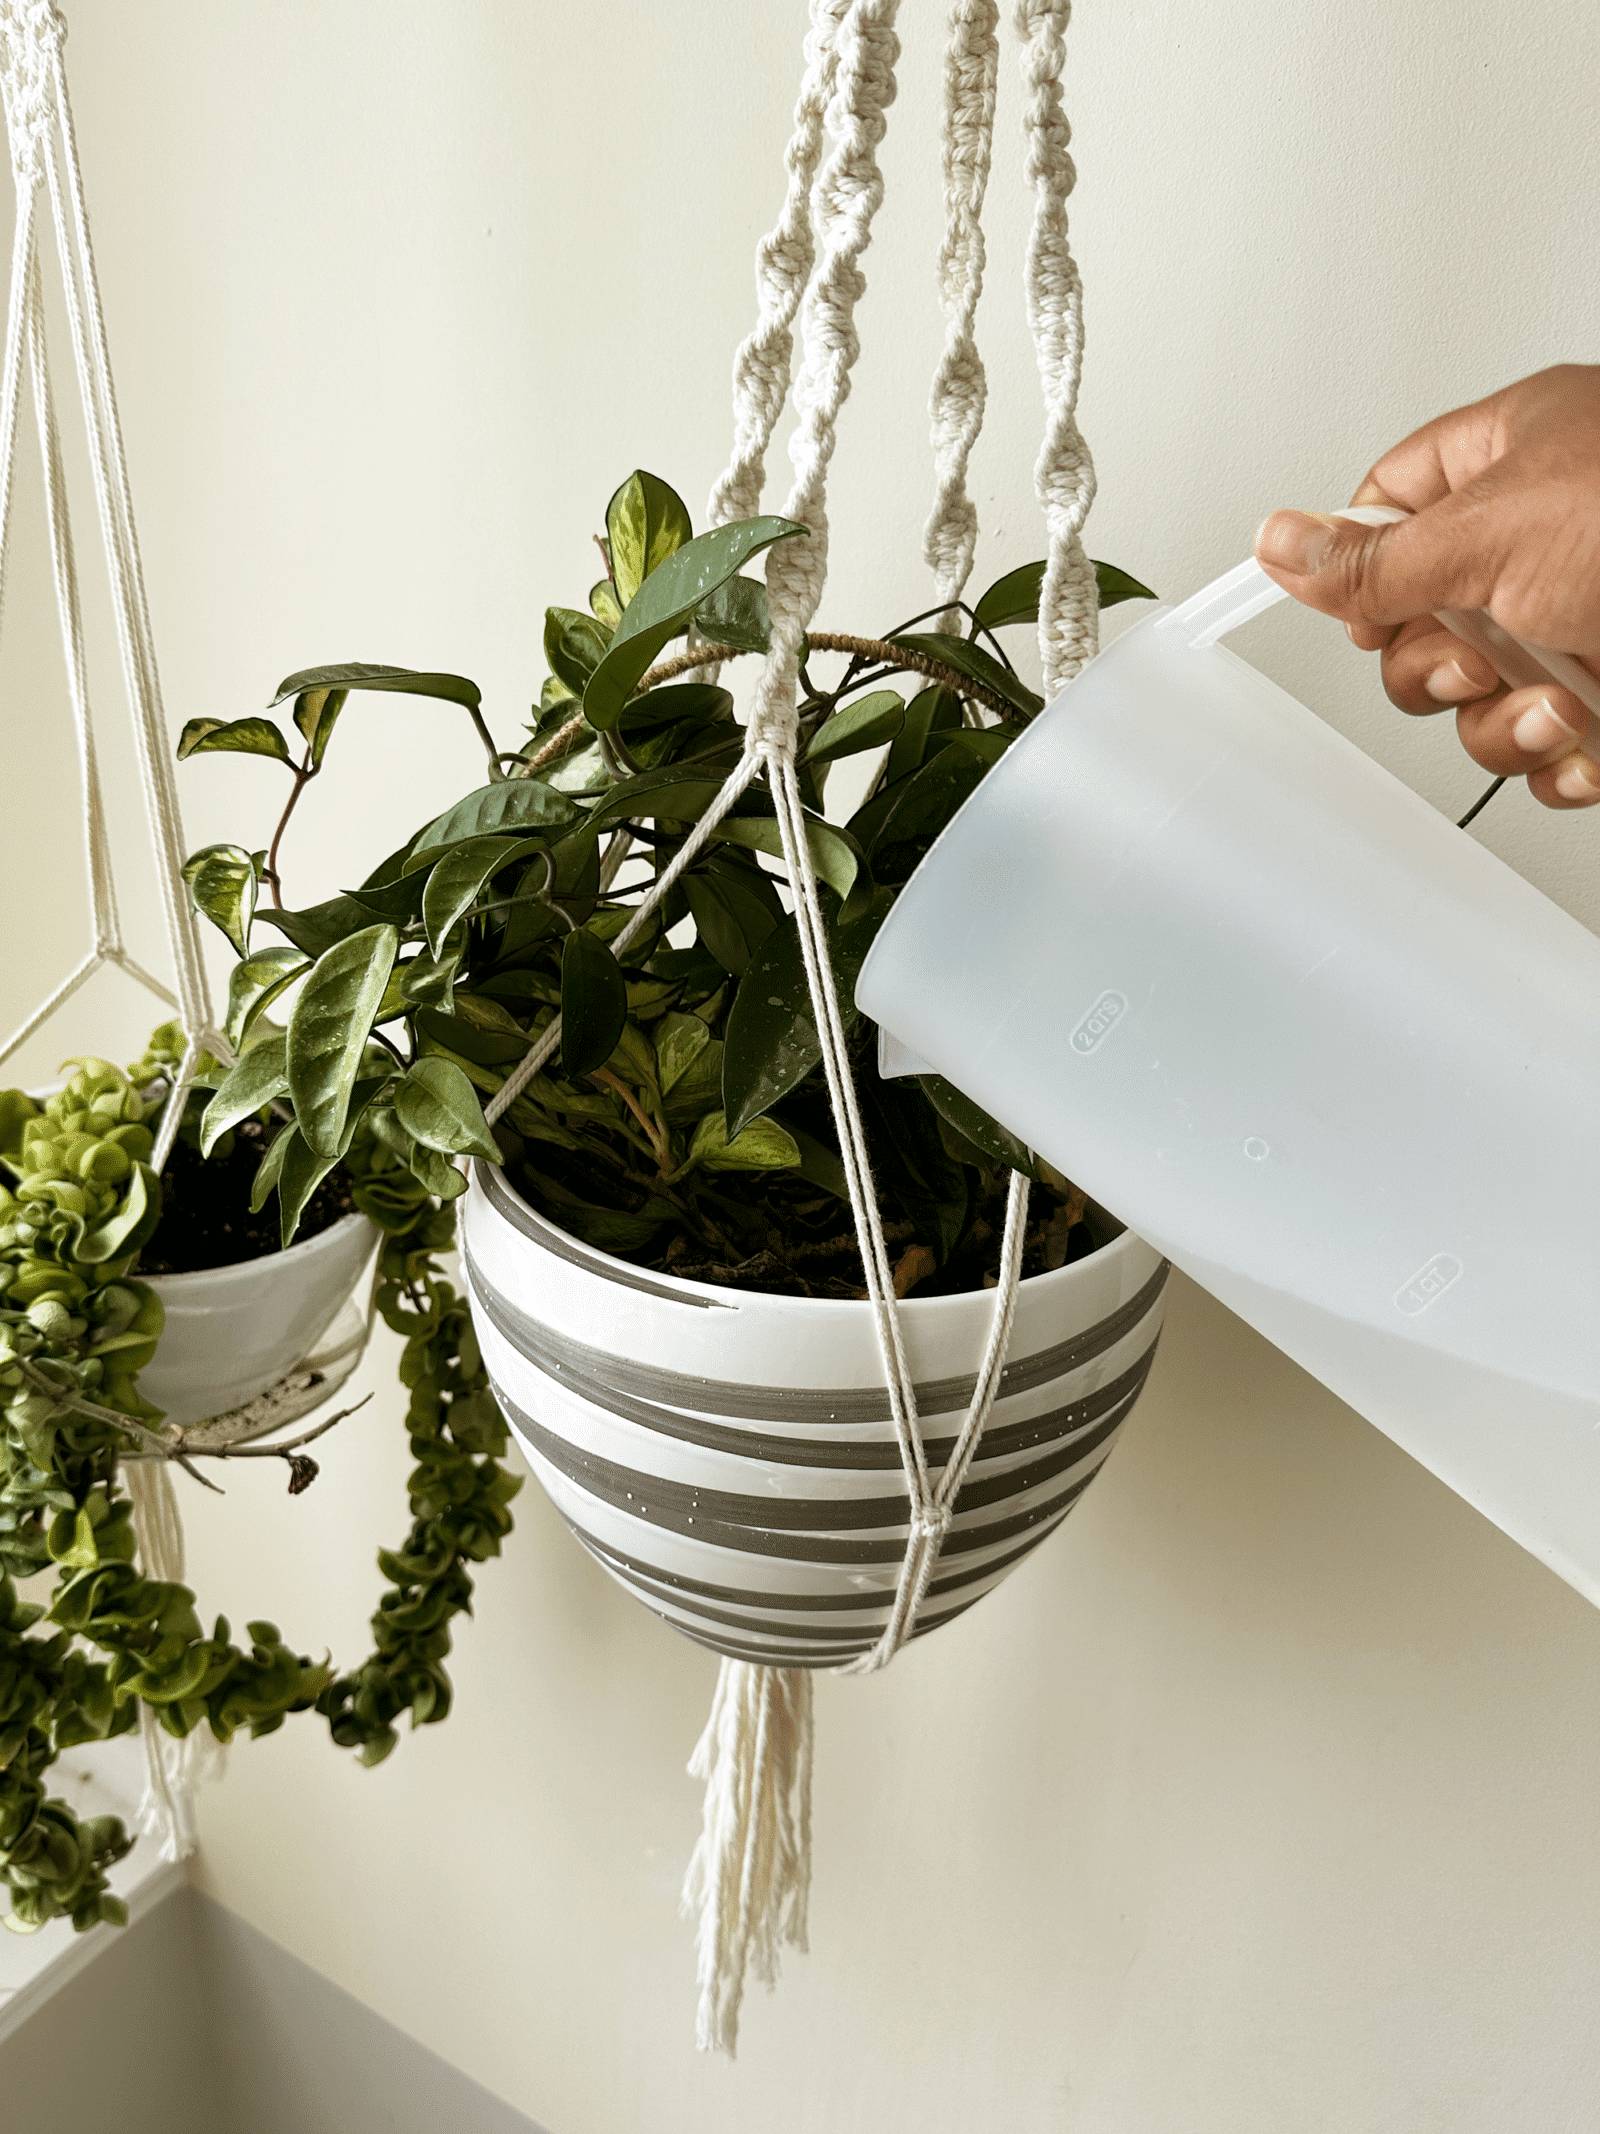
Water the planter until the soil is evenly moist but not soggy. Good drainage is key—bulbs can rot if they sit in water. I used a watering can for this, along with a spray bottle to keep the moss nice and moist.
After the initial watering:
Keep the soil lightly moist
Avoid letting it completely dry out
Never allow standing water at the bottom
Step Six: Provide Proper Lighting for Best Growth
Lighting plays a major role in how your bulbs grow indoors.
Place your planter in a bright, indirect light location, such as near a south- or east-facing window
Avoid intense, direct sunlight all day, which can cause rapid, weak growth
Rotate the container every few days, so plants grow evenly
Good lighting encourages sturdy stems, vibrant colours, and longer-lasting blooms.
Step Seven: Use a Seed Heating Mat for Faster Rooting
A seed heating mat can significantly improve your results, especially in cooler homes.
Benefits include:
Encouraging faster root development
Maintaining consistent soil warmth (ideal for bulb activation)
Reducing the risk of slow or uneven sprouting
Place the planter on the mat for the first couple of weeks after planting. Once shoots appear, you can remove them and move the planter to its display location.
Step Eight: Understand Each Bulb’s Unique Beauty
Hyacinths
Known for their dense, cone-shaped flowers and strong, sweet fragrance
Available in shades of pink, purple, white, and blue
Add a bold visual and scent impact
Paperwhites
A type of narcissus with delicate white blooms and a light fragrance
Extremely easy to grow indoors—no chilling required
Tend to grow quickly and may need light support as they stretch upward
Daffodils
Cheerful, trumpet-shaped flowers that symbolize spring
Typically bloom slightly later than paperwhites
Provide height and structure to your arrangement
Step Nine: Maintain and Enjoy Your Planter
As your bulbs grow:
Continue watering lightly
Keep them in a cool room (slightly cooler temps prolong blooms)
Remove spent flowers to keep the arrangement looking fresh
Creating an indoor spring bulb planter is a simple but rewarding project. By combining hyacinths, paperwhites, and daffodils in one container—and supporting them with quality soil, proper lighting, and gentle care—you’ll enjoy a long-lasting, fragrant display that brings the joy of spring right into your home. Remember, you are not limited by plant pots or plant containers. Try out teacups, teapots, and other fun containers for your spring bulbs! These also make the most beautiful gifts.
I’m so honoured to be a guest on Plant Project Canada’s blog once again. Be sure to tag me in your creations. Thank you for stopping by!
Hello everyone! My name is Shavonne, and my social channels can be found by searching Once Upon a Bungalow on most social media platforms. I’m on Plant Project Canada’s blog to teach you about the DIY Patio Pond. I’ll cover all the different aspects of the project in this article, from the supply list, to what soil to use, to what plants to buy and the overall maintenance that comes with having one of these ponds on your patio!
Similar to creating a traditional planter pot feature with soil, layers of different shapes and sizes of plants are important considerations to make. Create a stunning pond by including a variety of plants. Consider using tall plants for the back or middle of the pond, filler plants around your taller plants, and floating plants for the front of the patio pond.
Pre-made and ready-to-go options will be located in the pond plant section at your local greenhouse. Pre-potted options are super easy and my personal favourite. These are already potted in the proper soil and rocks, and allow you to simply drop the plants into the pond as they are and enjoy.
The tags on the plants will specify how deep to place the plants in your pond. Just like a traditional planter, each plant will have different requirements to ensure it grows and thrives to the best of its ability. For example, water lilies are beautiful but require being in a deeper pond, so keep that in mind when purchasing your pond plants. Just like flowers in your garden, the tag on the plant will list the optimal locations, sunlight needs, and depths of planting. Below are some of the many options for your patio pond.
Aquatic Water Bowl (A premade pre-potted mix you can find at your local greenhouse)
Floating plant: Water lettuce
Floating plant: Water hyacinth
Water lily
Blue Hawaii Colocasia
Barred Horse Tail (Equisetum Japonica)
Upright Water Clover (Marsilea Mutica)
Large-leaved Weed Mace (Typha latifolia)
Water Calla (Zantedeschia Aethiopica)
Yellow Creeping Jenny (Lysmachia numm Aurea)
Variegated Ginger (Hedychium coronarium)
Aquaris Hibiscus (Hibiscus Acetosella)
Water Pennywort (Hydrocotyle)
Hardy Water Canna (Thalia Dealbata)
Bronze Canna (Canna ‘Australis’)
Pitcher Plant (Sarracenia ‘Velvet’)
Primula (Primula Vialli)
Siberian Iris (Iris Siberica)
Variegated Sweet Flag (Acorus)
Chameleon Plant (Houttuynia)
Red Stemmed Parrot’s Feather (Myriophyllum Brasiliensis)
maintenance
The biggest thing to remember when caring for your patio pond is that it is not a pool, so the water is not going to stay perfectly clear and immaculately clean. This style of a patio pond is similar to a bird bath, which means you may have to dump it out, give it a quick rinse and refill it every so often. If you are having trouble with an excess of algae, try moving the location of the pond to a less sunny spot. If you are finding that the solar fountain isn’t circulating the water enough, add a plug-in pump to give more water movement.
most commonly asked questions
how do I avoid too much moisture in the soil below?
One of my biggest recommendations when making a pond with a planter pot around the bottom is to use Miracle-Gro® Moisture Control soil. This type of soil will ensure that the plants in the surrounding base pot won’t get over-saturated with water when the pond pot inevitably spills over into the plants in the surrounding base pot. Ensure there are drainage holes in the base pot as well to help with the excess water these plants will experience.
When choosing plants for the base pot, pick plants that don’t mind being exposed to more water. I’ve had success with creeping jenny, potato vines, and ivy. Try and stay away from plants that don’t like a lot of water, such as succulents, cacti, and other drought-resistant plants. Despite your best efforts, the water will spill over into this area, so take the time to protect the plants you have invested in.
how do you keep mosquitoes away?
This is an easy one! Mosquitos do not like moving water, they only like still water. As long as your pond has water circulating, mosquitoes shouldn’t be an issue.
how big of a pot do you use?
You can use as big or as small of a pot as you like. The larger the pot, however, the more plants you can enjoy in the pond. The larger pot in my video content is 30 inches wide by 17” high.
can you winterize the pond?
Just like other plants, you can winterize your pond plants. You’ll need adequate lighting, such as a very sunny window or a grow light to do so. You’ll also have to change out the water frequently to keep them healthy throughout the winter. Personally, I just purchase new pond plants every year as I don’t have the space to winter too many plants indoors; however, if you are able to winterize, this could be a big money saver in the long run. Keep in mind, I do live in Canada, so I am not able to keep my patio pond out all year.
can you add fish?
Fish require a lot more research to keep in a pond, it’s doable, but this is out of my scope of knowledge on the topic of patio ponds. They would likely need more circulation in the water than just a solar fountain. I recommend researching this topic in depth before adding pet fish to the mix!
is it safe for animals?
Wild animals such as birds and squirrels love ponds and bird baths! After speaking to a bee expert, I have learned that bees specifically like this type of water source as they prefer a more “natural taste” that a patio pond can offer. I can only speak from my experience when it comes to domesticated animals drinking from a patio pond. Our small pup, Mojito, has been fine after having the odd drink from the pond. We don’t encourage it, but he finds a way to sneak a drink here and there. If you are worried about your pet drinking from the pond, just take extra precautions to keep your pet away from your patio pond.
how many plants should I buy?
You don’t need as many plants as you think. Just like other plants, they grow and expand! Especially in terms of the floating pond plants. You likely will only need one plant of the floating variety in a small pond, and you’ll be surprised just how quickly these spread and grow. You can separate or propagate pond plants, just as you would any other plant.
I hope this helps get you started on your patio pond adventure. Please feel free to contact me with any other questions you may have. If you create a patio pond, please tag @PlantProjectCanada and/or @OnceUponaBungalow! We would love to see what you design!
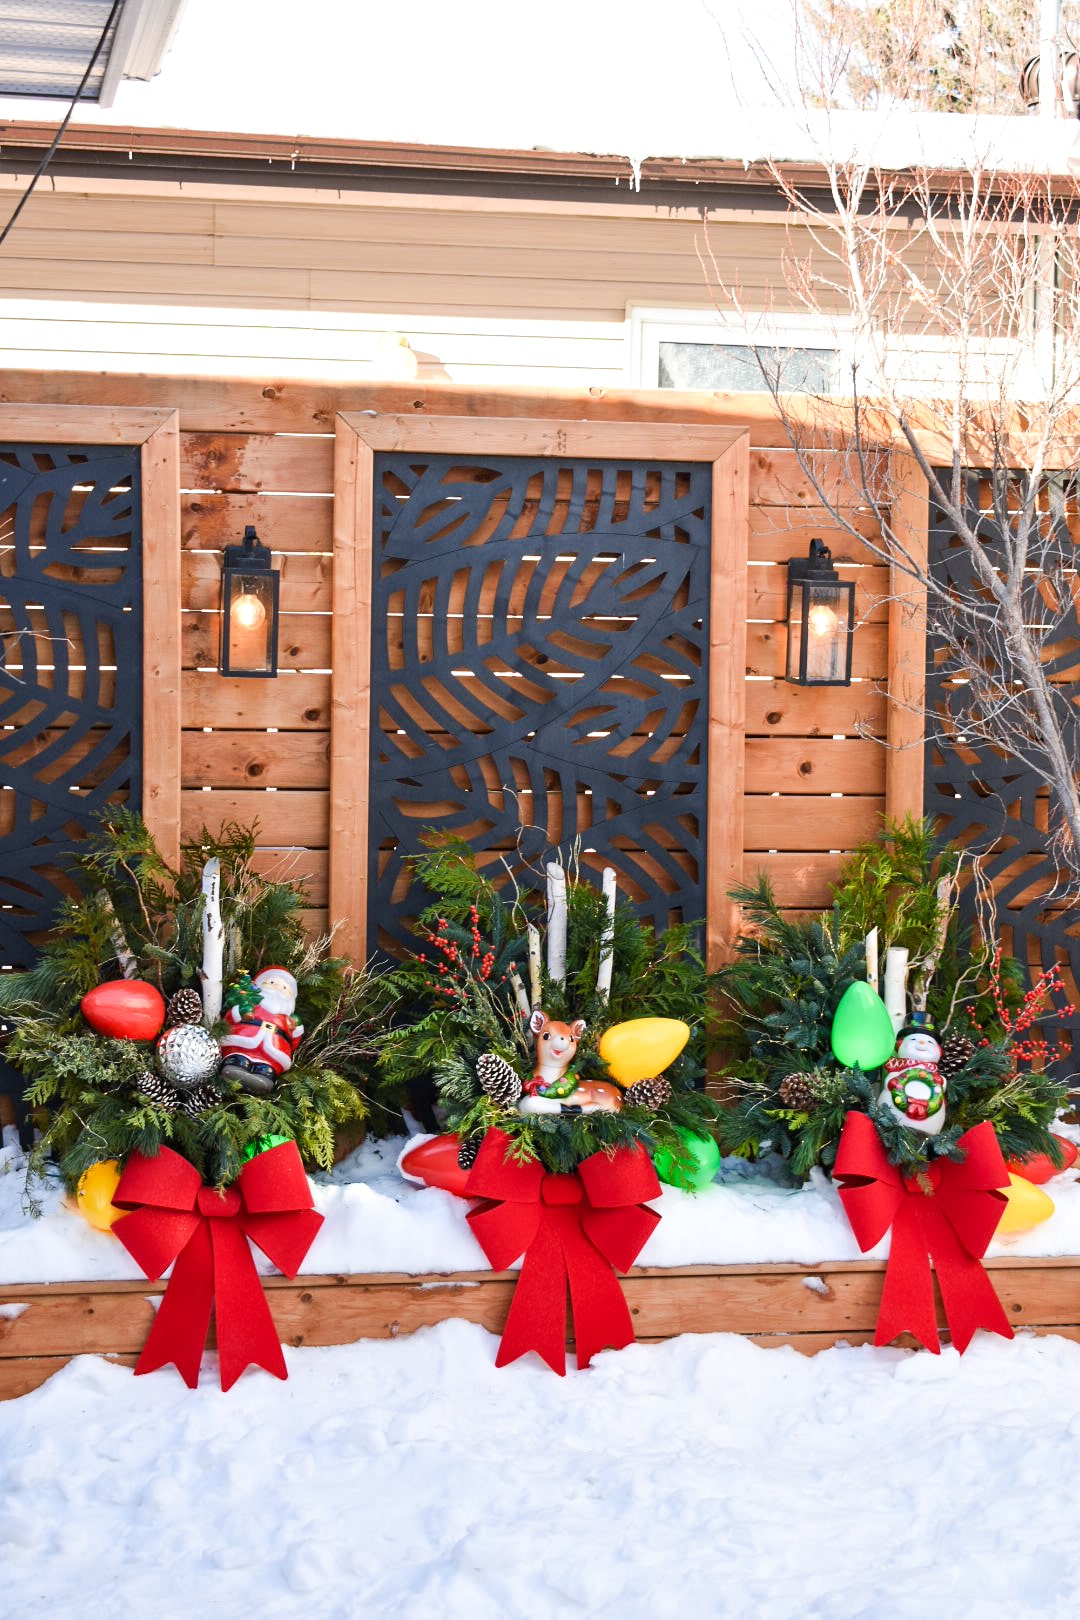
Hello Everyone! My name is Shavonne, and you can find me anywhere on social media under the name Once Upon a Bungalow. Plant Project Canada has graciously asked me back to give you some tips on creating outdoor holiday arrangements. Now, I’ll be honest with you, this was my first time making an outdoor arrangement. I’m not claiming to be an expert. I am, however, going to show you everything I learned, along with the materials I used to make these as quirky and unique as possible – a common theme in our bungalow. Be sure to check out this holiday outdoor arrangement reel on Instagram, Facebook, or Tiktok!
Alright, let’s go!
First things first: If you don’t know how to do something, ask someone who does! That’s precisely how I started this project, asking our local expert so that I could give you the best “how-to” article possible. I’d love to give a HUGE shout-out to Jacqueline Williams of Just a Girl in her Garden, a local greenhouse and flower shop. She took the time out of her busy holiday schedule to give me a course on how to create a long-lasting and gorgeous arrangement for our cold Saskatchewan winters. Check out Just a Girl in Her Garden’s webpage here.
Here’s what you’ll need:
Pine
Cedar
Fir
Oregonia
Birch Poles
Ilex Berries
Curly Willow
Miracle-Gro Potting Soil
Pot liners/ Container
Fairy Lights
Accents & Decor
Jumbo Christmas Lights
Pine cones
Wooden dowl
Floral Tape
Floral Wire
Diagonal cutters/ tin snips/ needle nose clippers/ or flower sheers
step 1.
Select you greens: I used three main foliage types for the arrangements (photographed above in order): Pine, Cedar, and Fir. Using different kinds of foliage gives the arrangement different colours, textures, and dimensions. I purchased an equal amount of each of these varieties, and I recommend you source your foliage from your local greenhouse to ensure the quality of the product. If you already have a garden full of these greens, you can also just cut off your own!
For accents, I used Oregonia, birch poles, and Ilex berries. These are more of an investment; however, you only need a few of them, and they add so much flair and personality to your arrangement. Later in this article, I’ll also show you the curly willow that is incorporated into the final design.
step 2.
Select you soil, pot, and decide on a layout: There are many options that can be used as a basis for the arrangement. Some prefer sand, and some prefer floral foam; however, in the harsh Saskatchewan climate that fluctuates regularly and sees extremely cold temperatures, our local garden expert, Jacqueline, recommended starting with the soil. I chose to use Miracle-Gro Potting Mix, which is ideal for outdoor and indoor containers. This will also help us prevent the branches from rotting and ensure we have a long-lasting holiday arrangement. This potting mix facilitates soil aeration that ensures oxygen reaches the plant branches, which is an essential factor in promoting overall arrangement health.
Your pot selection depends on the size of your arrangement and whether or not you would like to use a liner in your main pot. These three arrangements were going to be featured in our outdoor privacy wall planter, so I knew just the pot liner would work well for this project. You can also choose to build your arrangement directly into your main pot; a liner is unnecessary.
Deciding on your arrangement layout depends on how you want people to view it. Where is your arrangement going? Will it be seen by all the sides? Or will it only be seen from the front? Asking yourself these questions will determine how you build your design. For my vintage holiday arrangements, I knew there would be a backside that would rest against the privacy wall in our backyard. Instead of a “mound” style that is beautiful from all angles, I went for a forward-facing arrangement that will be primarily viewed from the front. Knowing my design direction, the back of my arrangement didn’t have to look good, and I could create height at the back of the pot instead of the middle. Tip: Explore Pinterest for inspiration before beginning.
step 3.
Start with the poles: Start with your birch poles. I used three as I like an odd number, but you can use as many as you like! This creates a central focus for your arrangement, and you can start building the rest from there. Stagger the poles to create different heights and vary the angles at which they are added to the pot. Remember, if you are building a mound arrangement (an arrangement that will be viewed from all angles), you will want to place these in the center. However, these were placed more toward the back because I am building a forward-facing arrangement.
step 4.
Add the greens: One of the biggest things I learned from my class at Just a Girl in Her Garden was to make sure that you take off the lower branches, needles, and leaves from the base of your foliage to ensure that the plant does not rot within the soil. Before placing it in the pot, ensure the bottom 3-4 inches are clear of all needles, leaves, and branches. Some you can remove with your hands, and others can use either tin snips, floral sheers, diagonal cutters, or needle nose clippers.
step 5.
Add the accents: Take into consideration what you want in the center of your arrangement. I knew that I wanted the vintage Santa, reindeer, and snowman as my focal point, so I included parts of the shorter greenery facing downwards in the front to create a resting spot for these elements. After putting all the fir, pine, and cedar in place, I added some curly willow, glitter branches and pine cones. To attach your accent items and focal point items, use floral wire and wrap the wire around the item you would like to secure, and then anchor the wire to a birch pole, or another strong point of your foliage. This keeps everything secure and in place.
step 6.
Add the lighting: Next, I added the Ilex berries, jumbo-size Christmas lights and fairy lights. The lights do make all the difference! These fairy lights were battery operated, but I recommend getting plug-in lighting or solar lighting that you can set to come on when it gets dark out at night – it’s just less hassle.
step 7.
Water your arrangement: After completing all these steps, ensure you water your arrangement well; however, do not overwater. If you accidentally put too much water in the soil (like I did), drain it out before putting it outside to freeze. If you fail to do this and have too much water in the pot, the plastic can burst open with the expansion of the frozen water! Remember, if temperatures go above zero, you must water these arrangements often! They do drink quite a bit. If temperatures stay below zero, they should remain lovely, lush, and green, and you won’t have to worry about watering.
ta-da! you’re done!
Honestly, I was pretty worried about messing up before I started making these! As it would turn out, you really can’t mess up! Have fun with it, get creative and add finishing touches that make your arrangement represent what makes you happy and brings you joy. I went for an over-the-top, vintage, quirky Christmas, and I’m so glad I did. I hope you guys enjoyed this tutorial! Happy Holidays from my family to yours! – Shavonne
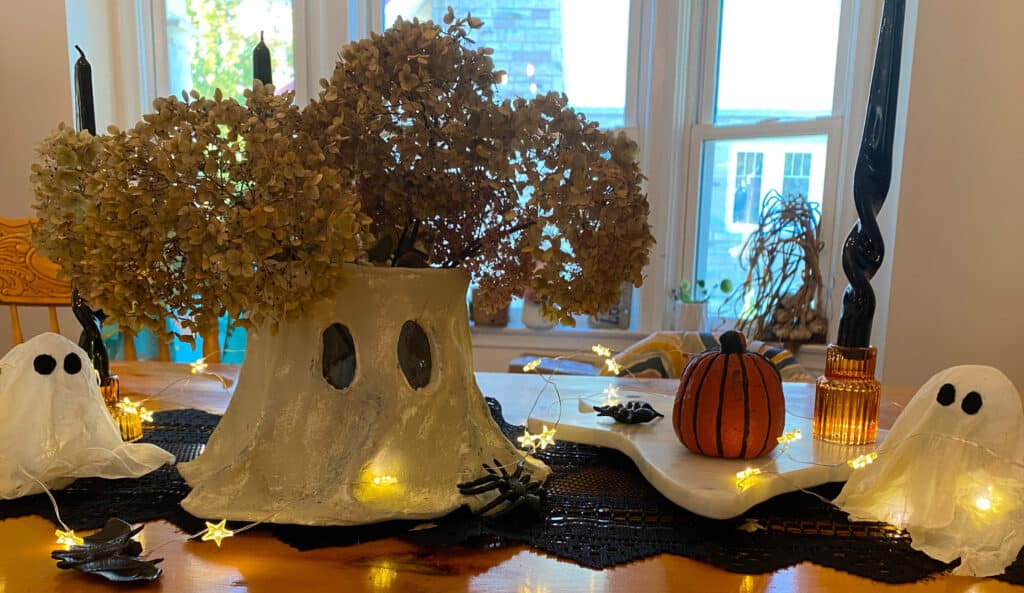
We have some spook-tacular Halloween crafts that are sure to haunt your home with fun and festivity! Whether you’re aiming to add a ghostly charm to your indoor plants with a Ghost Vase or a chilling ambiance to your front porch with Creepy Planters, each project is a blend of creativity and delight. Perfect for all ages, these crafts invite you to embrace the playful spirit of Halloween. So, gather your supplies, summon your imagination, and let the Halloween crafting commence!
Ghost Vase
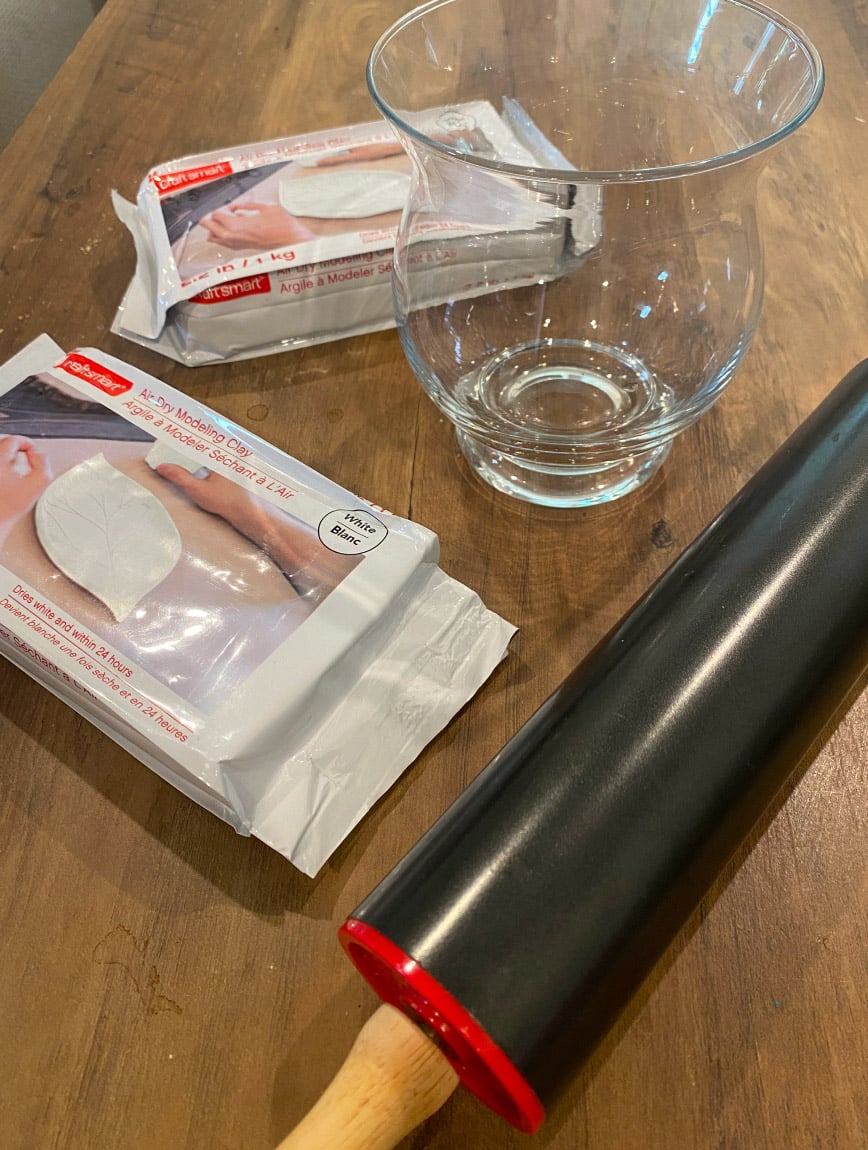
What You’ll Need
Air dry sculpting clay
A vase
Paint – Grey or White (or any colour you can imagine!)
Directions
Pop in some flowers, add water, and enjoy your spooky floral arrangement with blooms from your garden!
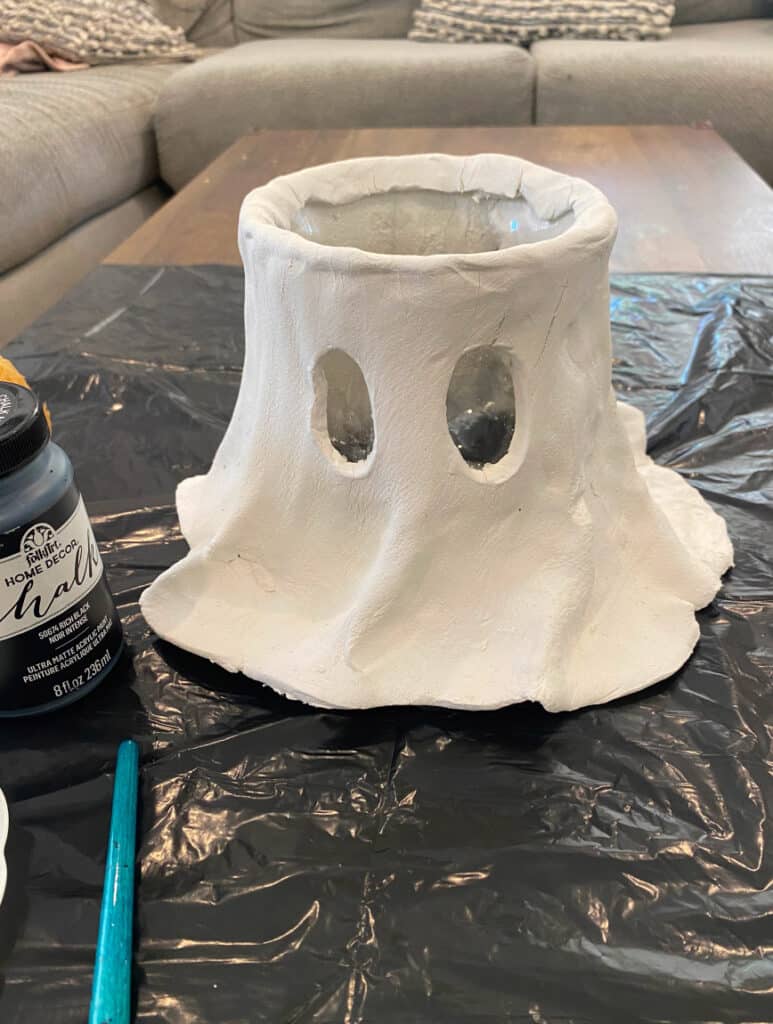
Roll out your clay into a nice, even slab. It should be a little longer than the vase’s circumference. Cut it into a neat rectangle with straight edges at the top and bottom. Bonus points if it’s tapered so it flares out at the bottom like a ghostly skirt!
Shape it around the vase. Try to keep it wider at the bottom to mimic loose fabric.
Peek-a-boo! Cut eye holes into the clay so you can see the vase and your ghost can keep a watchful gaze on your guests.
Optional: Leave your ghost au naturel or add a layer of paint for that extra cloth-like feel.
Ghost Garland
What You’ll Need
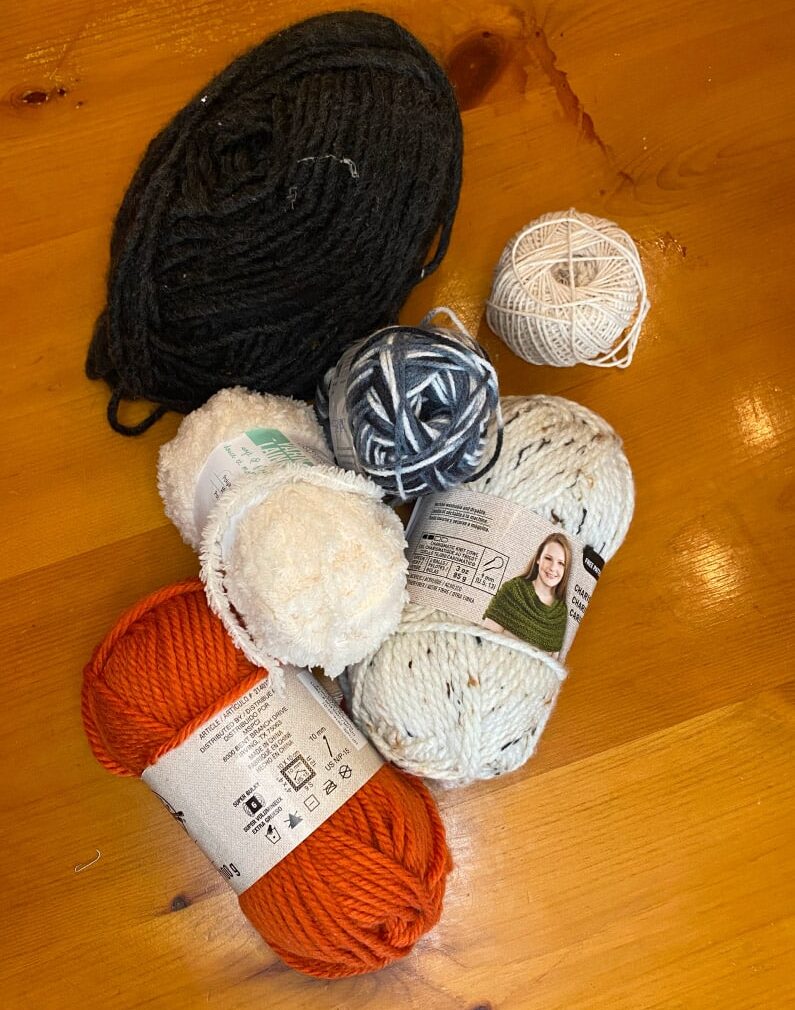
A variety of yarns in different colours
Yarn for hanging (macrame yarn or fishing wire works great)
Felt for spooky eyes
A clean toilet paper roll
Directions
Cut your hanging yarn to the length you want your ghostly garland to be.
Flatten your toilet paper roll
Choose a yarn colour and wrap it around the roll about 30 times or until desired thickness.
Tie the top of your yarn using the same colour and cut the yarn at the bottom where the toilet paper roll ends.
Place your yarn pieces on the yarn used for the garland so where you tied it together is sitting on the garland yarn. Fold the top section of yarn over garland yarn. Using another piece of yarn (Same color as your ‘ghost’) wrap around the ghost and tie to create the head.
Repeat the process until you’ve got a full ghostly gang!
Cut out eye shapes from your felt (pro tip: use a hole punch for quick circles). Glue the eyes to your ghosts. We only added eyes to the white ones—let the others be mysterious Halloween pom-poms.
Hang your spooky creation and enjoy!
Cheese Cloth Ghost
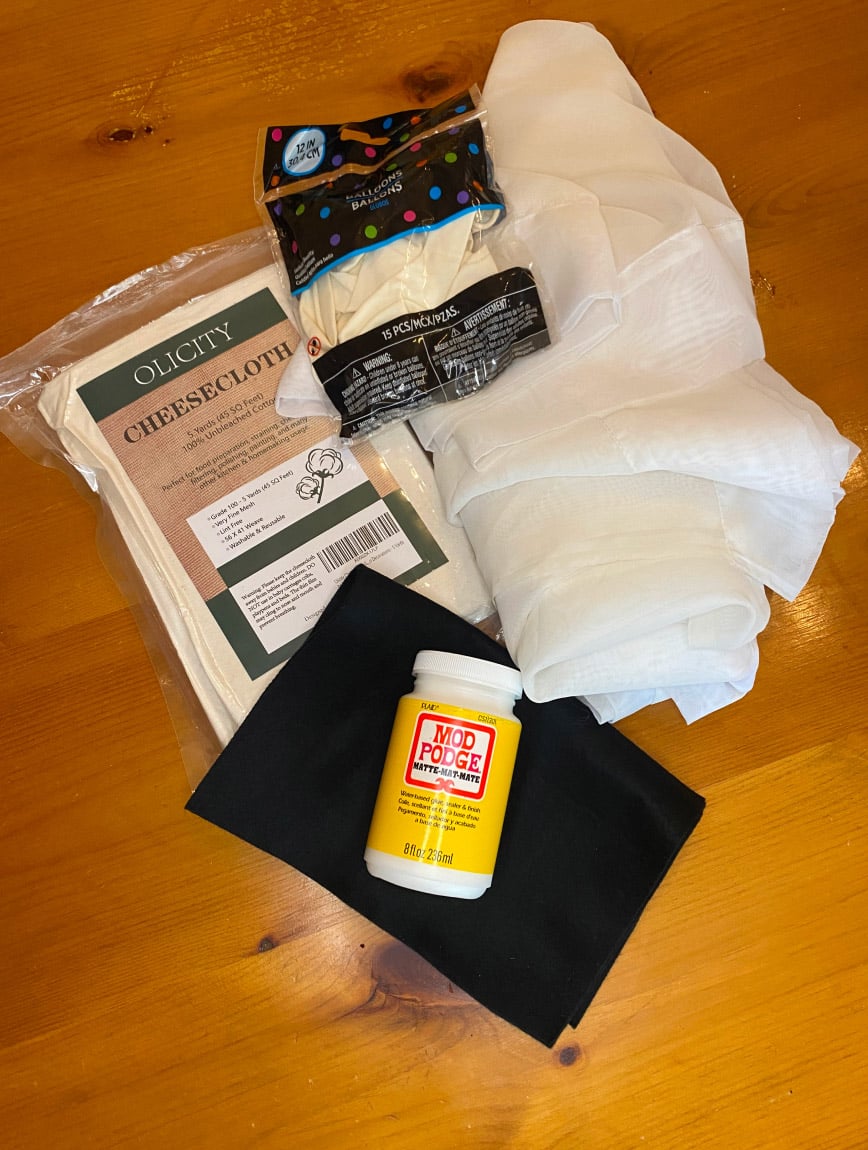
What You’ll Need:
Cheese cloth or any white fabric at hand
Balloons
Various cups, vases, or bottles
Modge Podge or school glue
Black felt
Optional: Battery-operated lights for extra spookiness
Directions
Mix equal parts of Modge Podge or glue with water in a big container. Warning: it’s messy, so maybe use something disposable!
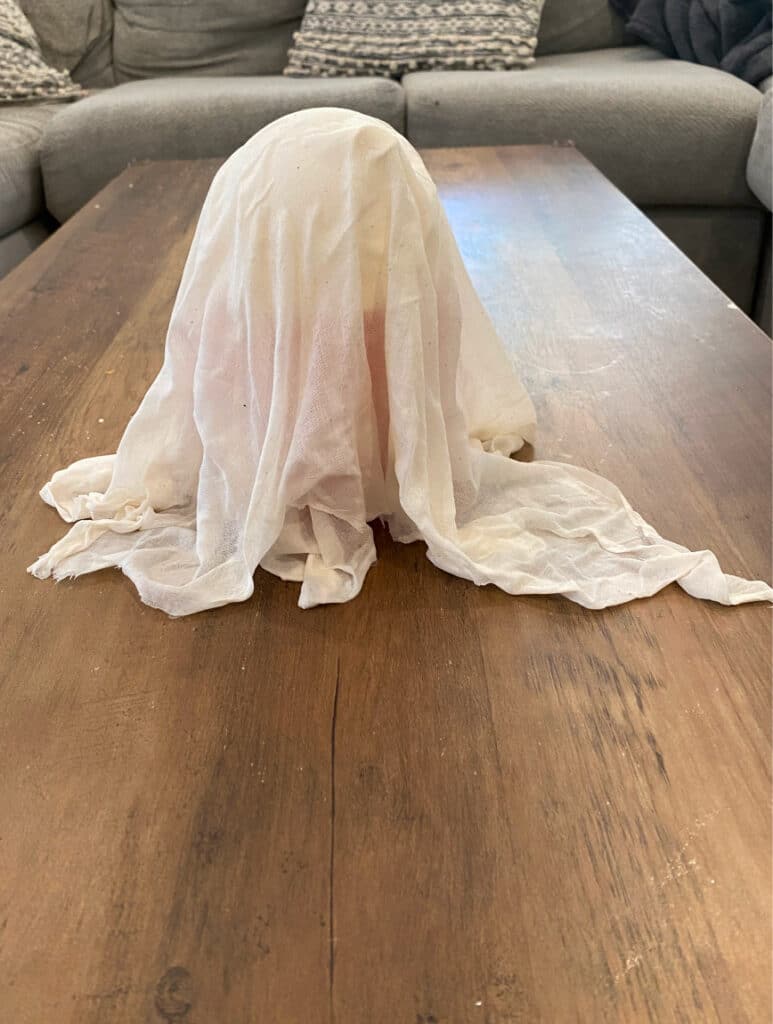
Blow up your balloon to the size of your future ghost’s head and sit it atop a cup or vase of your desired height. Cut your cheese cloth to drape over the balloon and spill onto the ground.
Drench the cheese cloth in the gluey mixture, squeeze out the extra goop, and drape it over your balloon and cup.
Let your ghost dry overnight or for a solid 12-24 hours.
Once dry, remove the cup, pop the balloon, and set your ghost free!
Cut out eyes and mouths from felt and glue them on.
Optional: Pop some battery lights inside for a haunting glow. Try different sizes for versatile spookiness: tall for doorways, small for tables, or hang them!
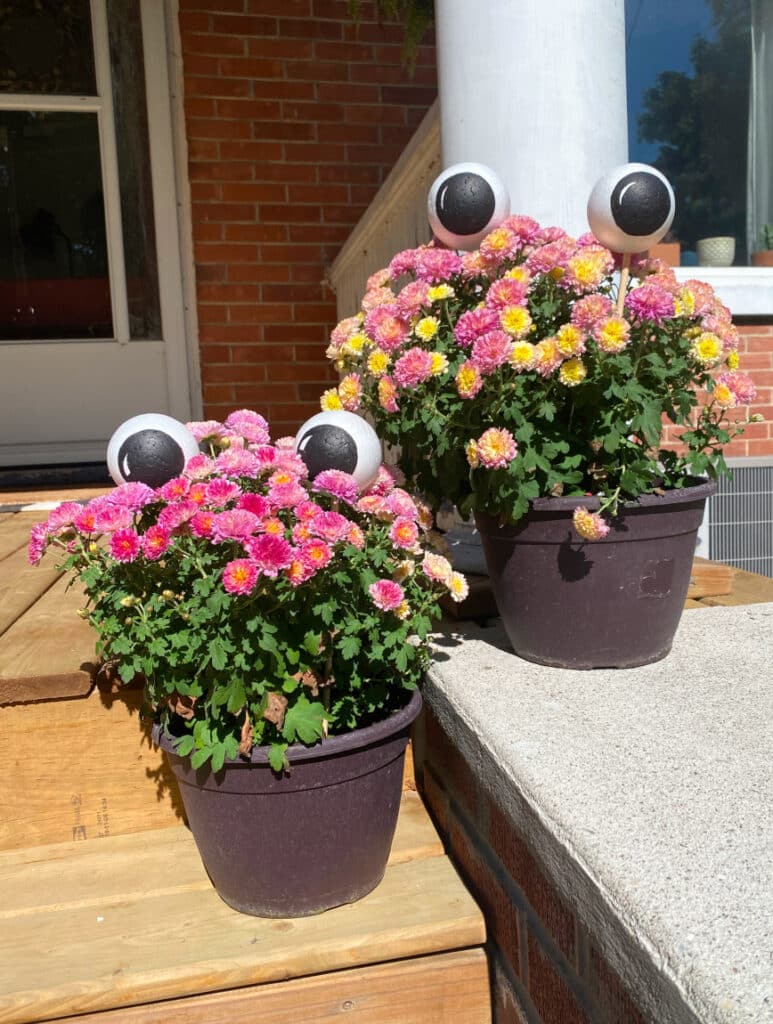
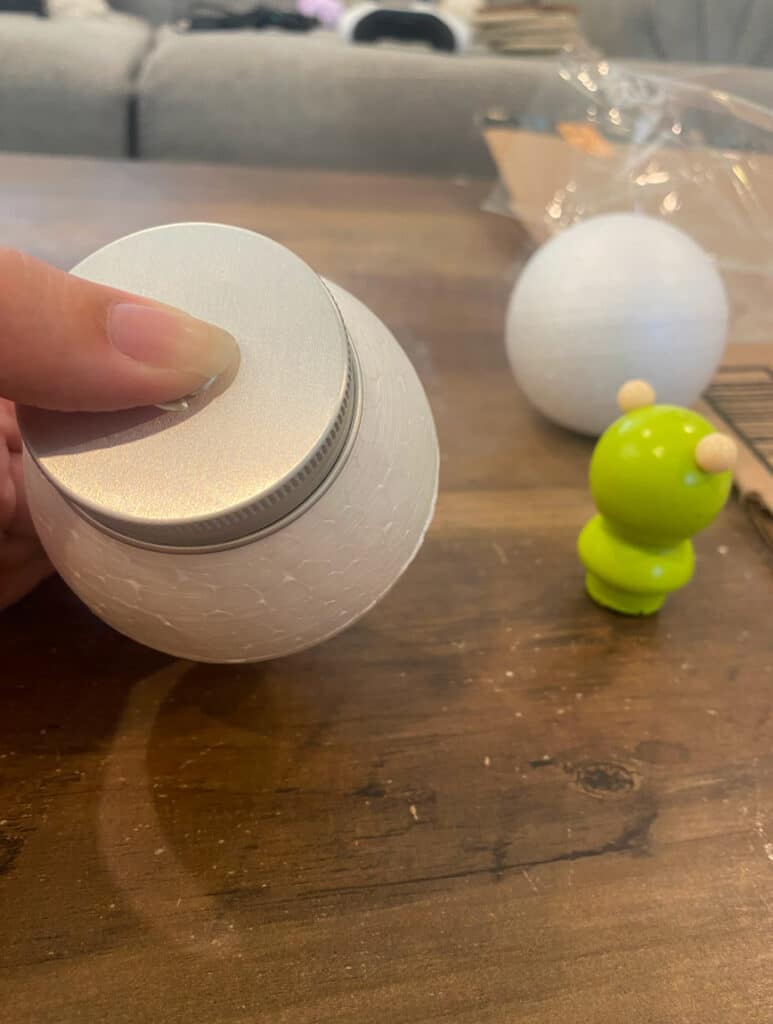
Plant Eyes
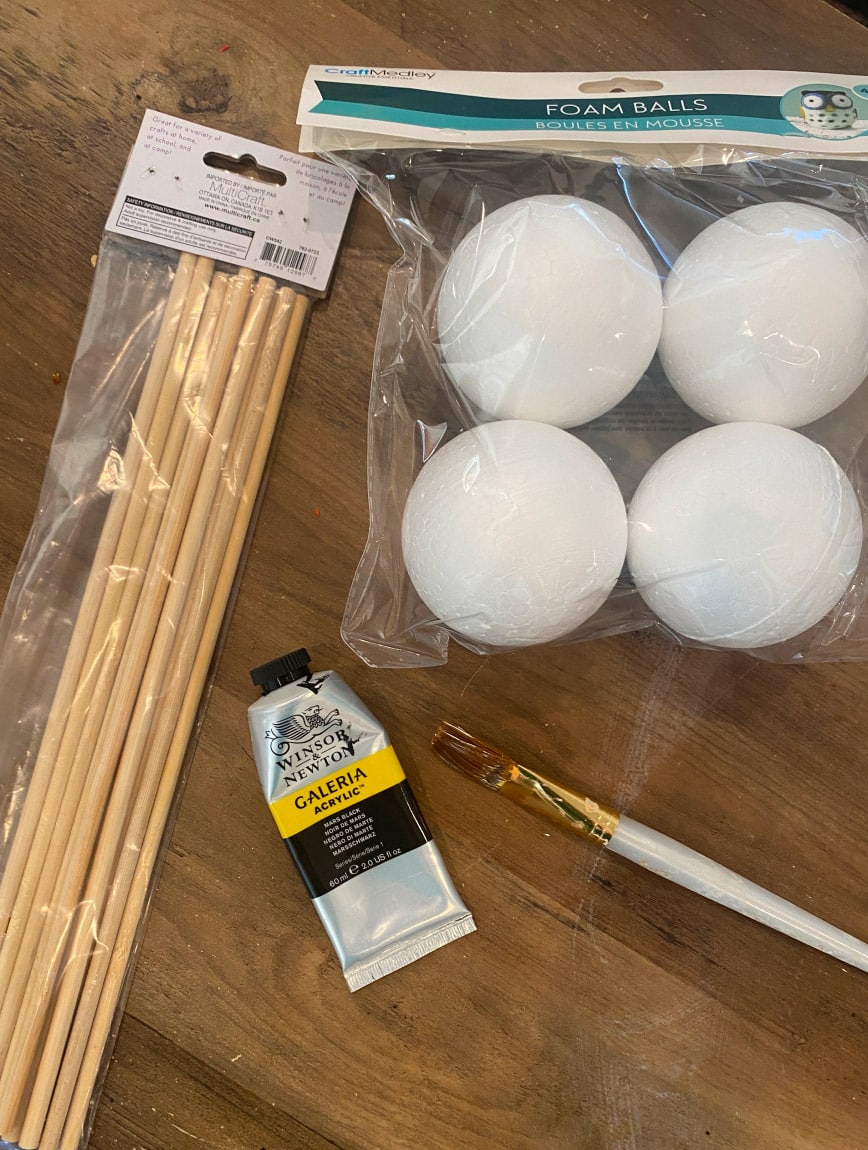
What You’ll Need:
Cheese cloth or any white fabric at hand
Balloons
Various cups, vases, or bottles
Modge Podge or school glue
Black felt
Optional: Battery-operated lights for extra spookiness
Directions
Paint large, eerie black circles on each Styrofoam piece (or get creative with colours, glow-in-the-dark effects, or creepy veins). Tip: trace something round to draw circle before painting.
Stick a wooden stake into the Styrofoam or glue it on for stability.
Nestle these eerie eyes into your plants or bushes for a peeping effect!
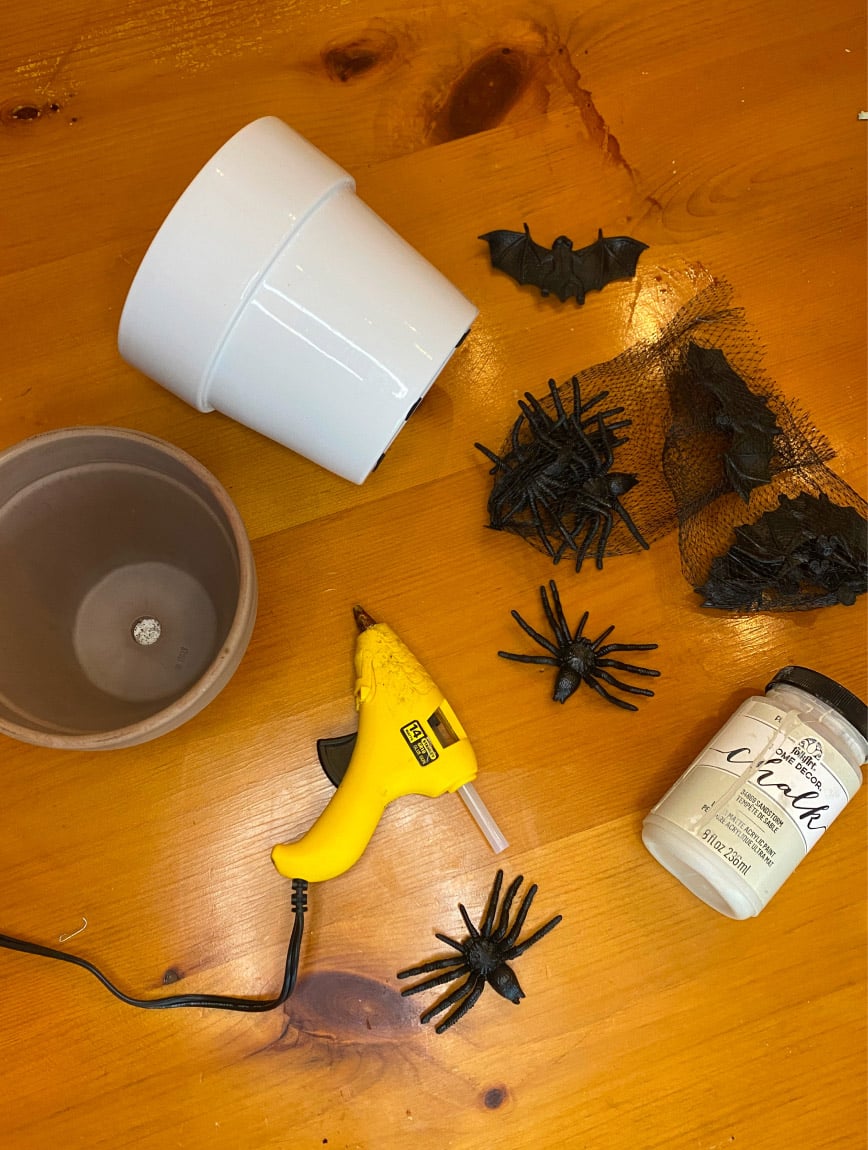
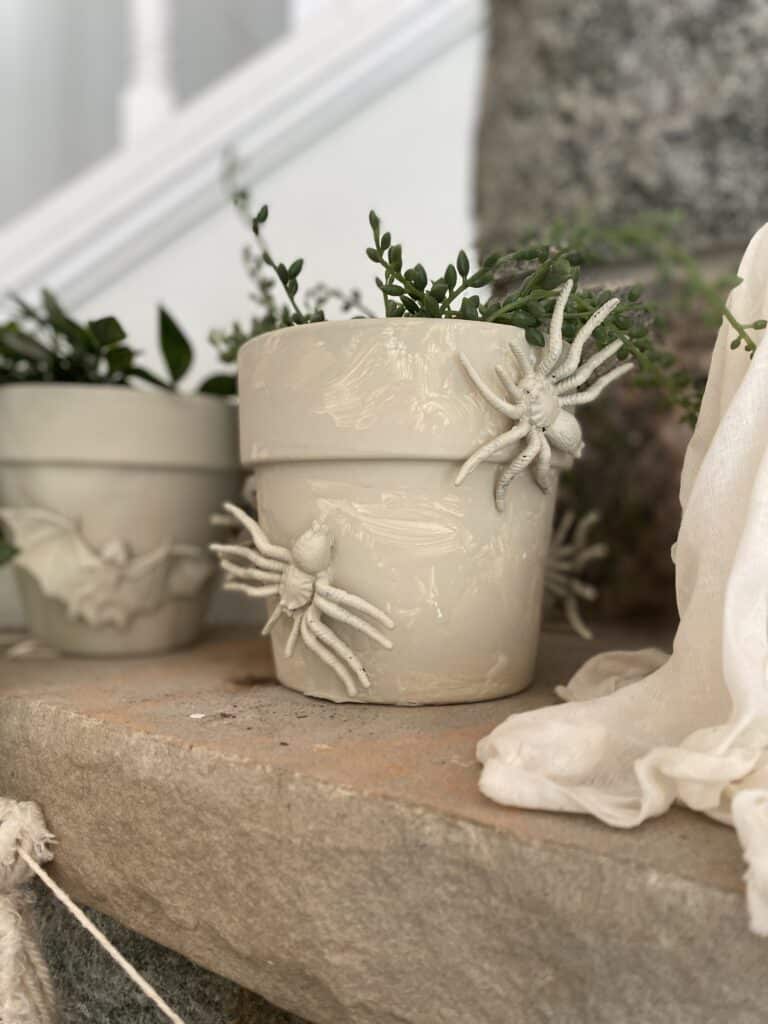
Creepy Planters
What You’ll Need:
Planters
Plastic spiders or other creepy crawlies
Chalk paint
Glue (a glue stick will do)
Directions
Glue your creepy critters onto the planters.
Paint over the planters and bugs with chalk paint (other paints work, but chalk paint sticks better, especially if your planters are shiny).
Style with plants and watch your creepy creations come to life!
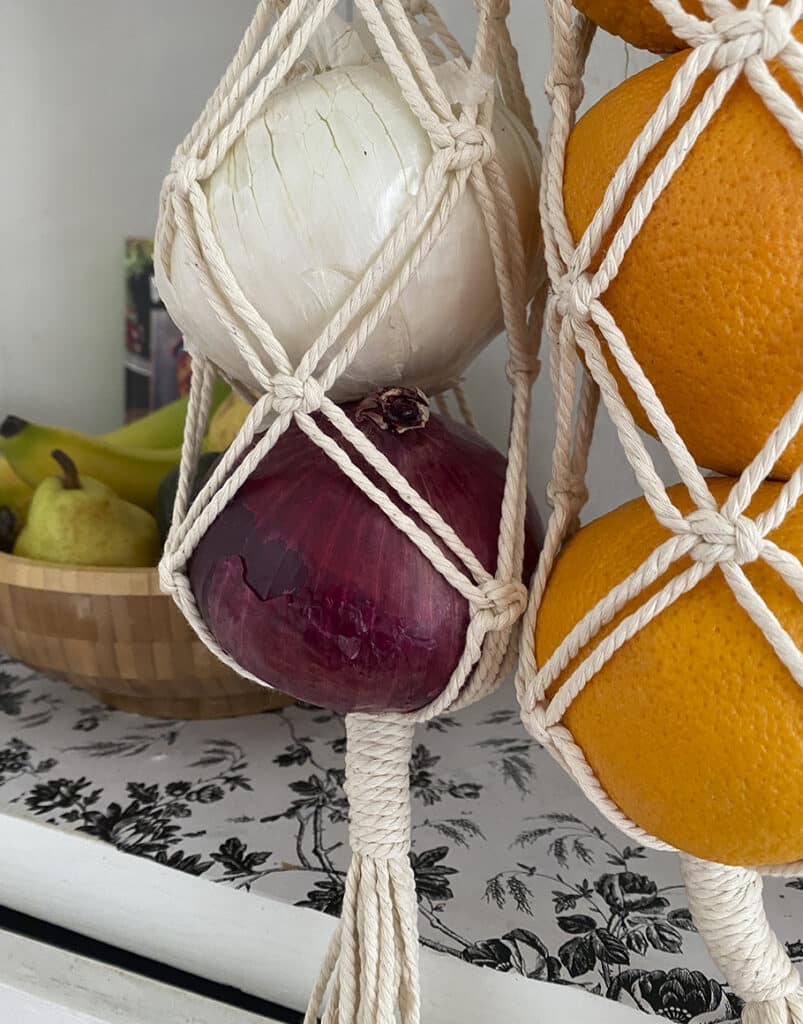
Looking for a fun and sustainable way to store your freshly grown fruits and veggies? Use our DIY easy macramé produce net!
Not only will you end up with a chic, eco-friendly storage solution, but you’ll also get the satisfaction of creating something beautiful. Perfect for beginners and craft enthusiasts alike, this project promises to add a touch of handmade charm to your kitchen or pantry.
Here’s what you’ll need:
3mm Macrame Yarn
Scissors
Masking Tape
Let’s get crafting!
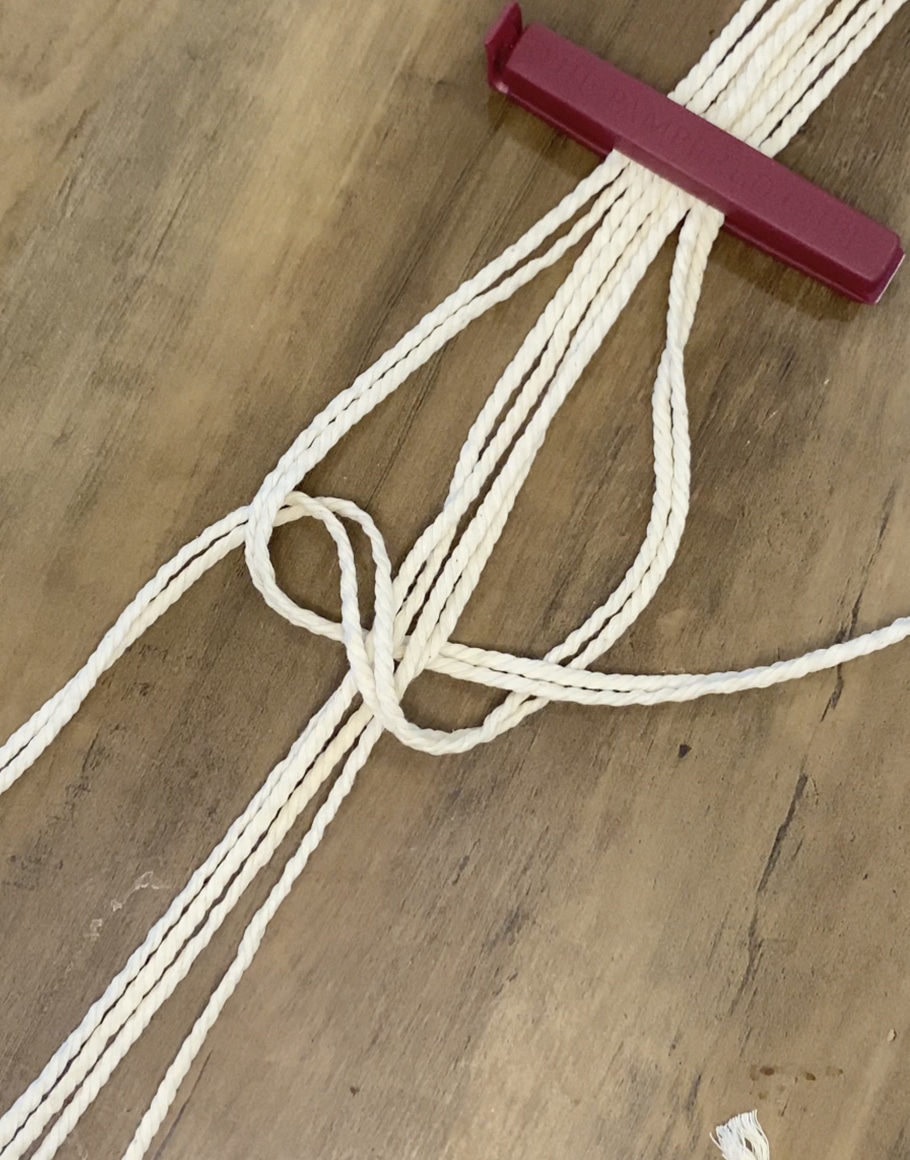
step 1
Cut macrame yarn into 8 pieces measuring about 120” long. You can tape the ends of the yarn to avoid the yarn from fraying.
step 2
Gather the 8 pieces cords and find the center. Create the handle by making a vertical row of Square Knots. Tie the Square Knots with 4 cords grouped together in the middle, 2 cords on the left, and 2 cords on the right. Make 18 vertical Square Knots to make the handle.
step 3
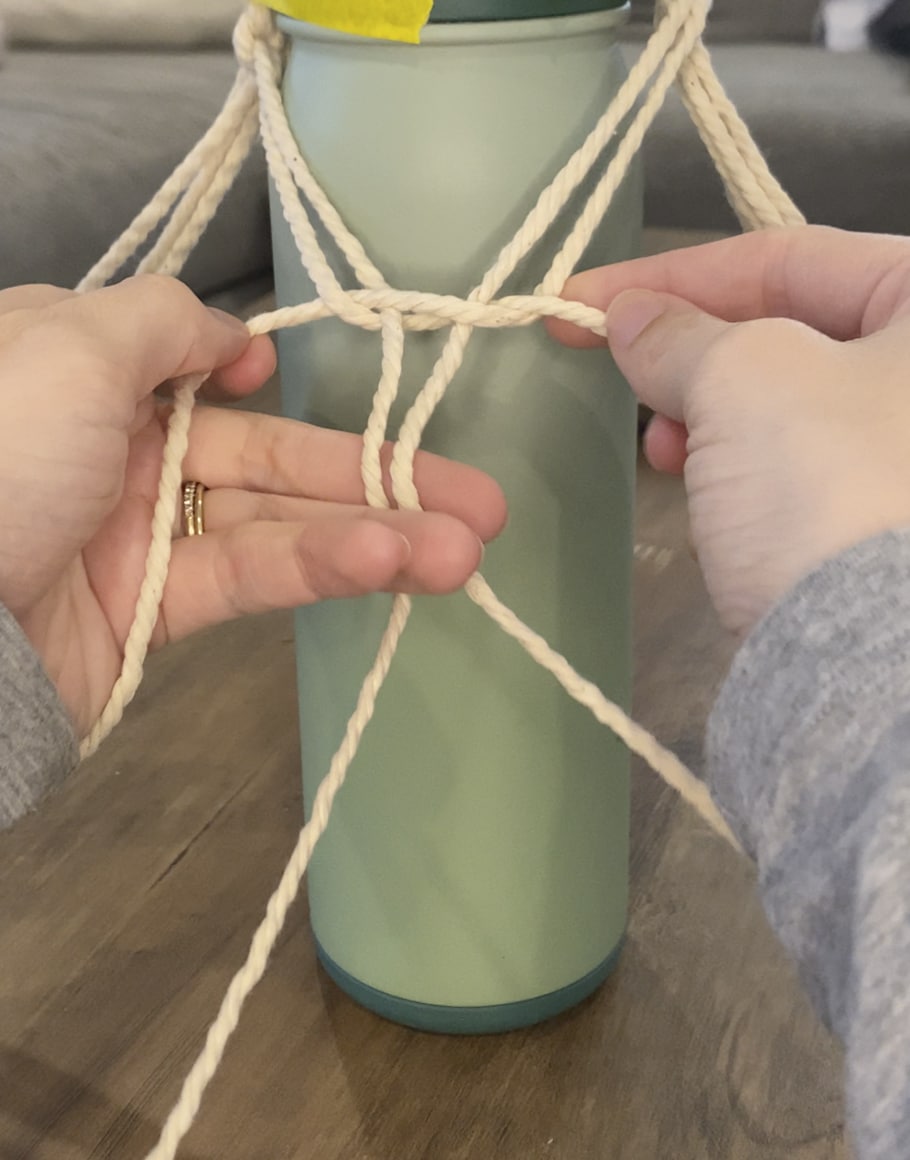
Tape the handle to the top of a slender water bottle. This can help to make a form for the bag’s shape. Then take two cords from each handle and tied them together in a Square Knot. Make sure you don’t space out the rows too much, keep them as close and as tights as possible.
step 4
After the rows of Square Knots reach the bottom of the water bottle, un-tape the handle and gently pull the bag up. Re-tape and continue making more Square Knots. Do this until you reach your desired length of the bag.
step 5
When finished weaving the body, make a Wrapping Knot. Trim the tassel to your desired length and fray. Start filling your produce bag with veggies or fruit of your choosing!
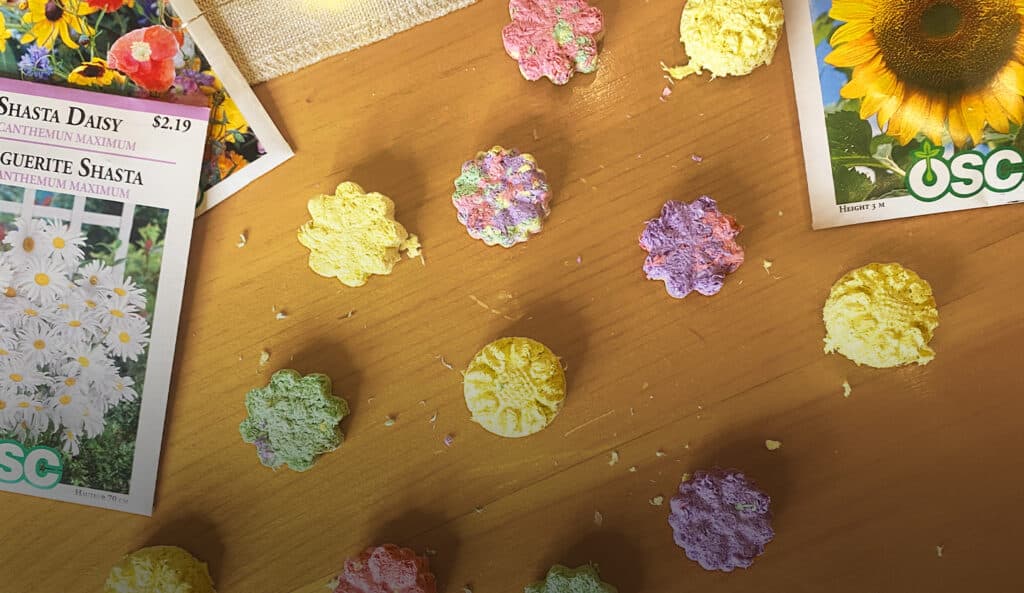
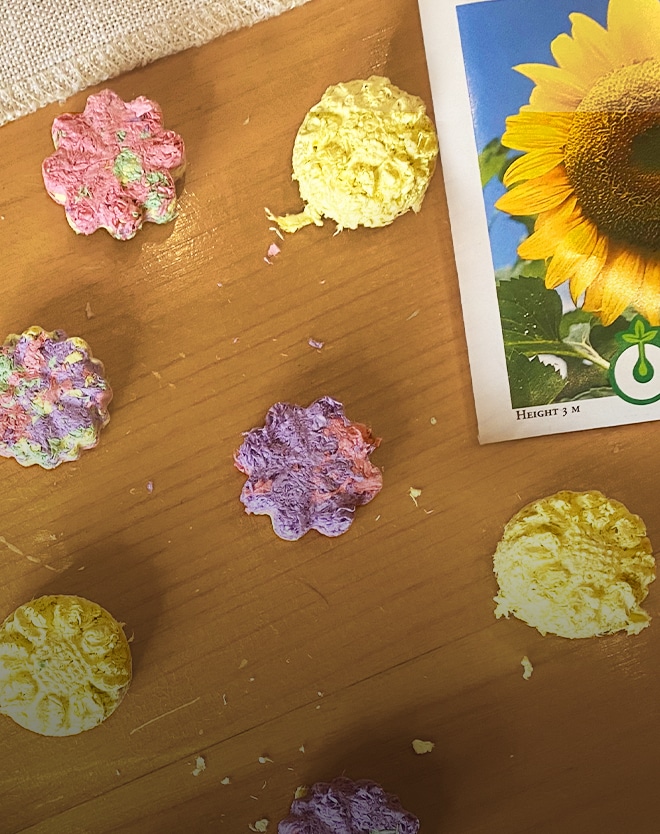
These delightful DIY flower-shaped seed bombs are an ideal gift for Mother’s Day.
Show your appreciation for MOM by using your imagination and customize with your favourite shapes or colours!
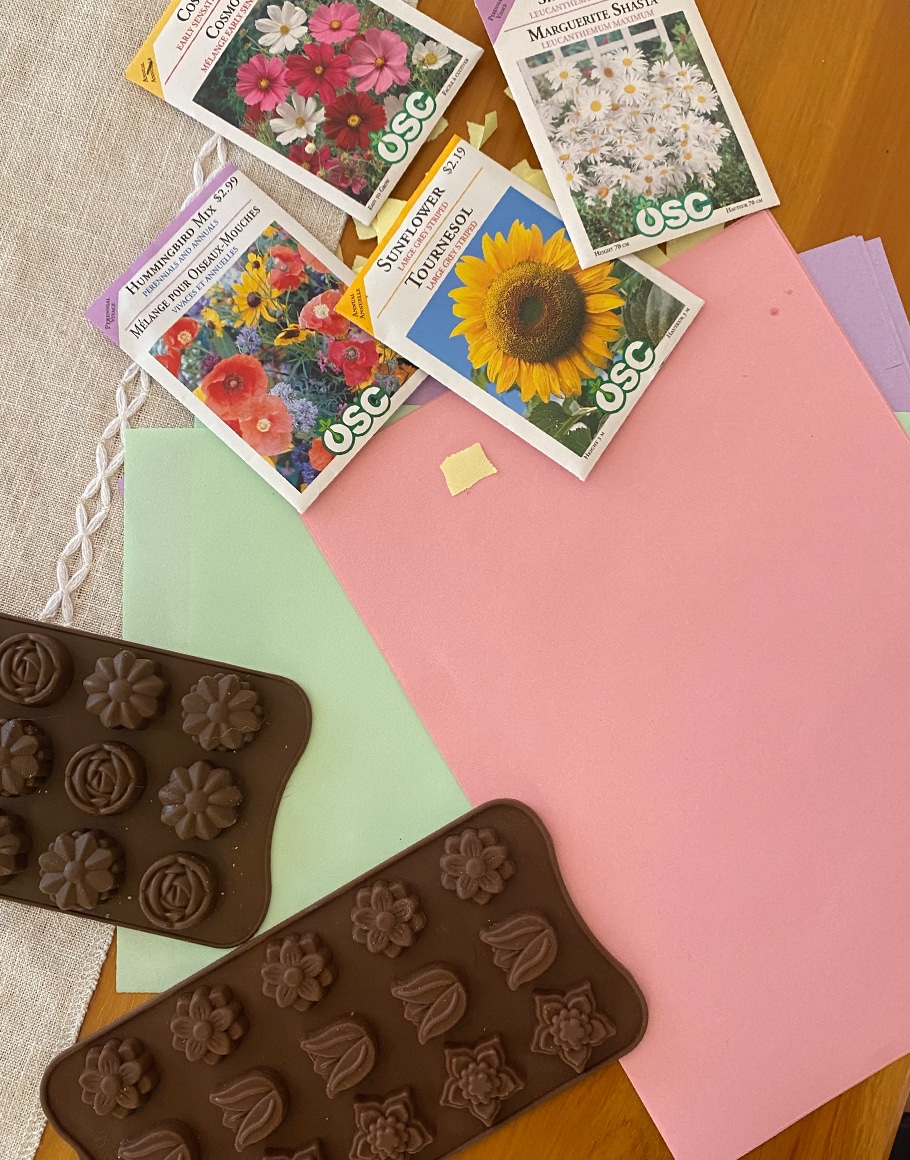
Here’s what you’ll need to get started and create these plantable treasures:
Tools:
Blender
Materials:
1 packet of your chosen seeds
1 sheet of your favourite coloured paper
1 silicone mould in the form of flowers or any design you fancy
lets gro #plantproject
step 1.
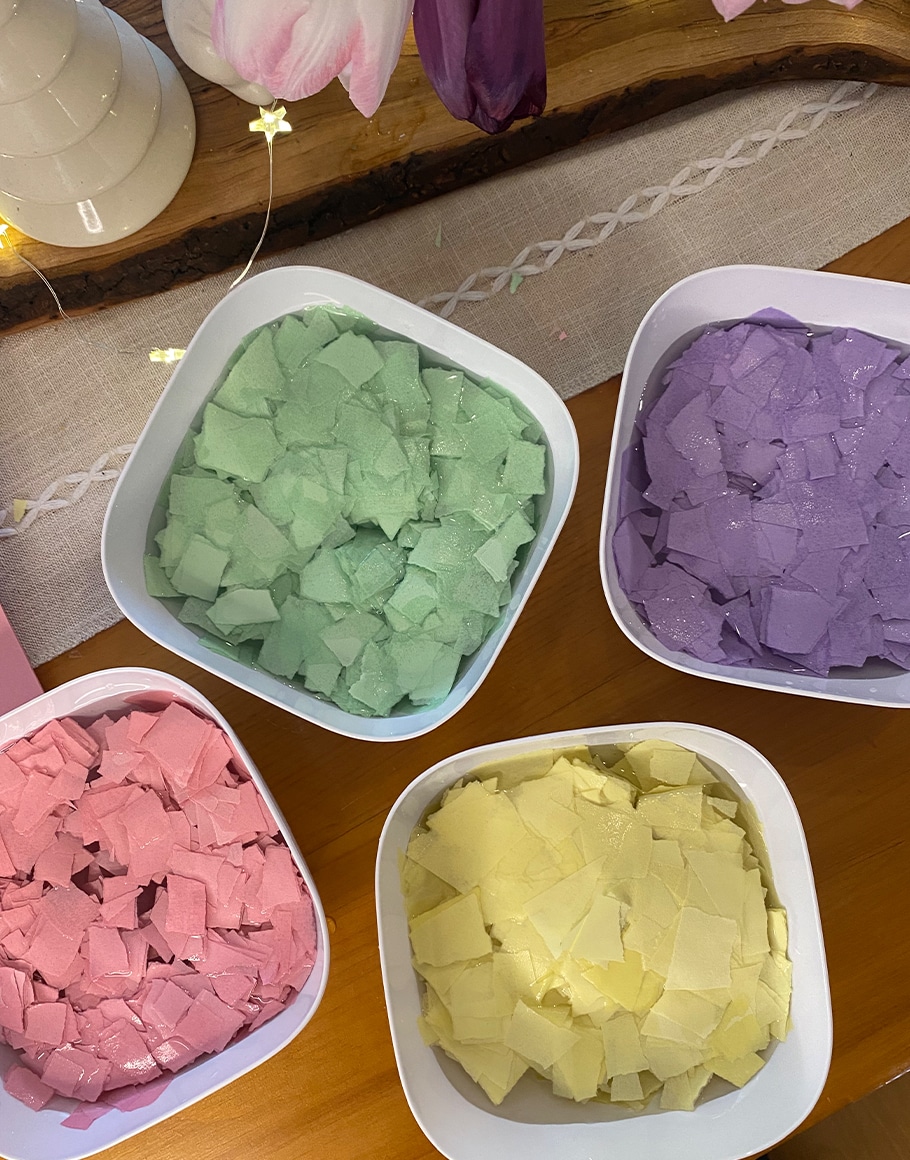
Begin your project by tearing the coloured paper into confetti-sized pieces.
step 2.
Submerge the shredded paper in water in a bowl. Allow it to soak for up to 20 minutes.
step 3.
After soaking, remove the paper from the water and transfer it into the blender. Blend it until you achieve a fine, wet pulp consistency.
step 4.
Squeeze out any extra moisture from the paper so it’s not dripping wet.
step 5.
Press the paper halfway into your mould.
step 6.
Delicately sprinkle the seeds on the paper, then cover them with another layer, filling the mould to the brim.
step 7.
Patience is a virtue as you wait for the seed bombs to dry in the mould. This will take approximately 2 to 3 days.
step 8
Once fully dry, remove your seed bombs from the mould with care.
Voilà! Now you have a handful of flower-shaped seed bombs, ready to sprout into life or as a heartwarming present for Mom. The perfect gift, with love and growth wrapped into one.
Share your seed bombs using #PlantProject or tag us @plantprojectcanada and join our community.
Whether you’re new to the world of hoyas or a hardcore hoya collector, getting these gorgeous plants to bloom can be such a rewarding experience.
Hoya blooms only last a few weeks, which makes it feel extra special when it does happen. If you’re having a hard time making those cute little star-shaped flowers appear, these tips will help set you up for success.
lets gro #plantproject
don’t overwater!
Letting the plant’s soil dry out between waterings puts a little stress on it to survive, which in turn encourages it to put out new flowers to try to ensure its survival. Rather than relying on a watering schedule to tell you when to give your hoyas a drink, touch the plant and soil. If you squeeze a leaf between your fingers and it’s squishy, time to water; if it’s firm, wait a couple days and check again. If you stick a finger in the soil and it feels dry to the touch, it’s time to water; if it feels damp, wait a few days as well.
make sure your hoya gets lots of light – like, LOTS of light.
Not only are hoyas hardy plants, but hoyas are also tropicals, so they thrive in bright light. My hoyas that flower most frequently get a few hours of direct sunlight each day, and bright indirect light the rest of the day. In my experience it’s hard to give these plants too much light – if exposed to 6+ hours of direct light a day, they may even start to show the pretty patterns typical of a sun-stressed plant.
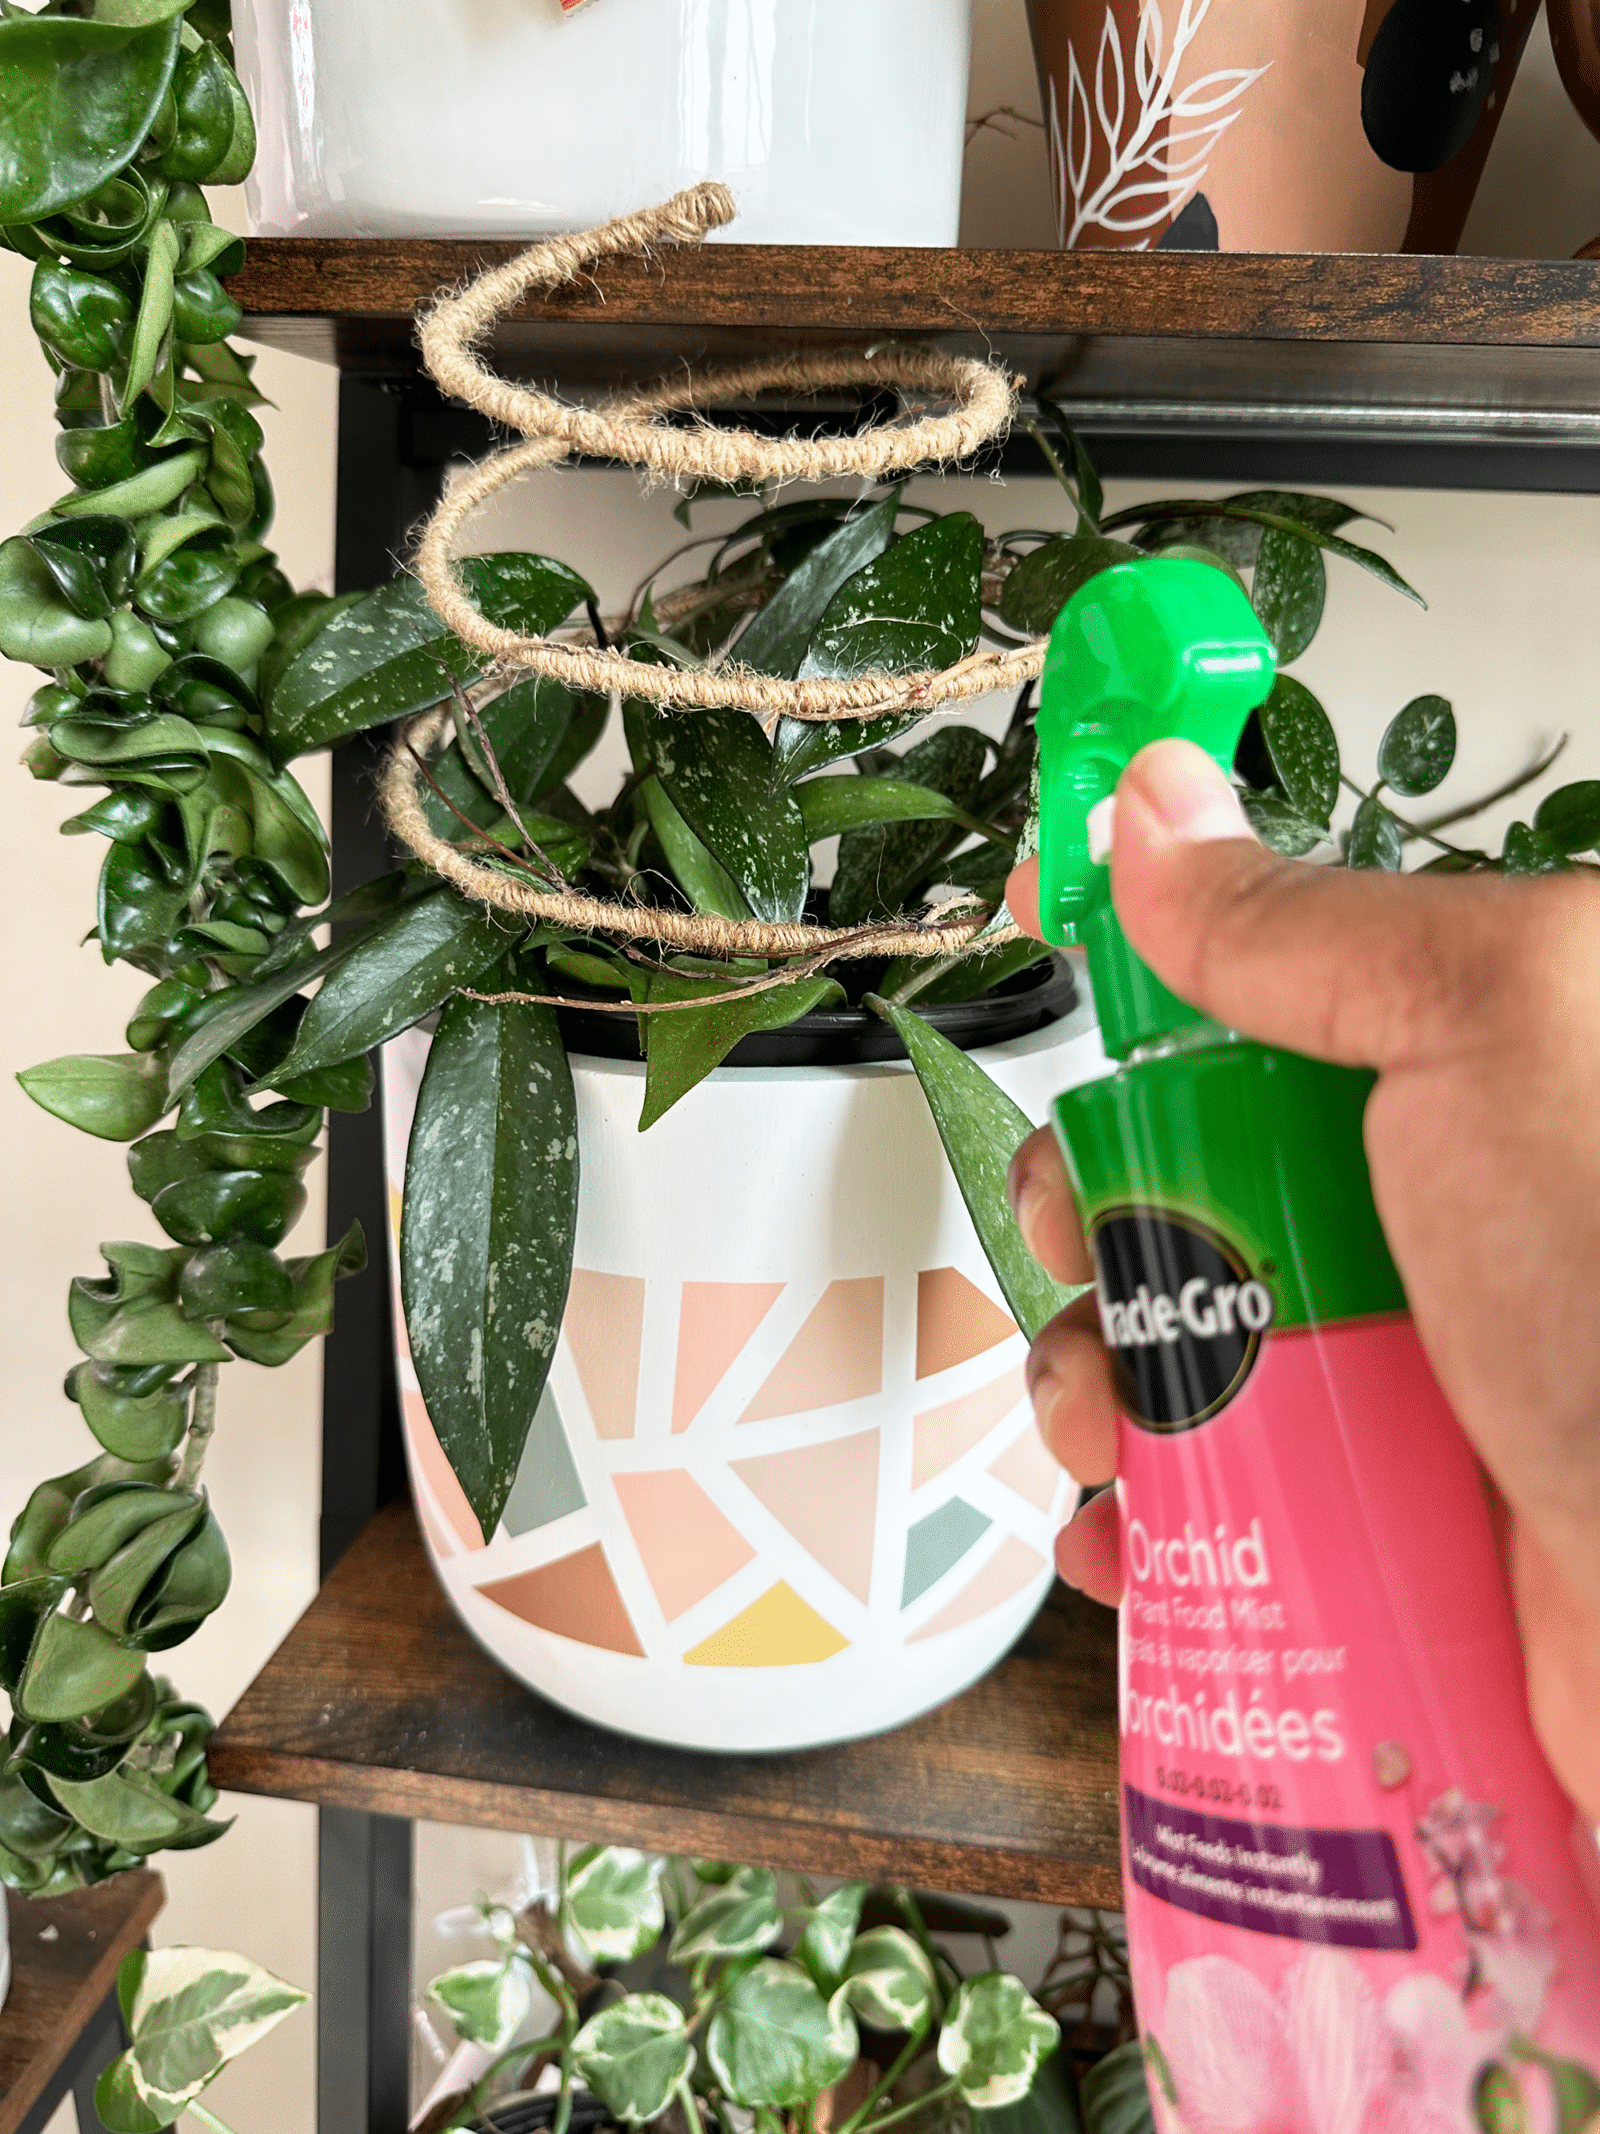
feed me, see more…flowers!
If you want a plant to put out new growth or blooms, it needs the nutrients to do so. Although you can of course use a tropical plant food the next time you water your hoya, I’ve had great luck fertilizing mine with the Miracle-Gro Ready-to-Use Orchid Plant Food Mist. Like orchids, hoyas are epiphytes. In the wild, epiphytic plants grow not in soil, but attached to other plants, and absorb water and nutrients from the air. Spraying plant food on in the form of a mist allows a hoya’s leaves to absorb those nutrients the same way they would in the wild.
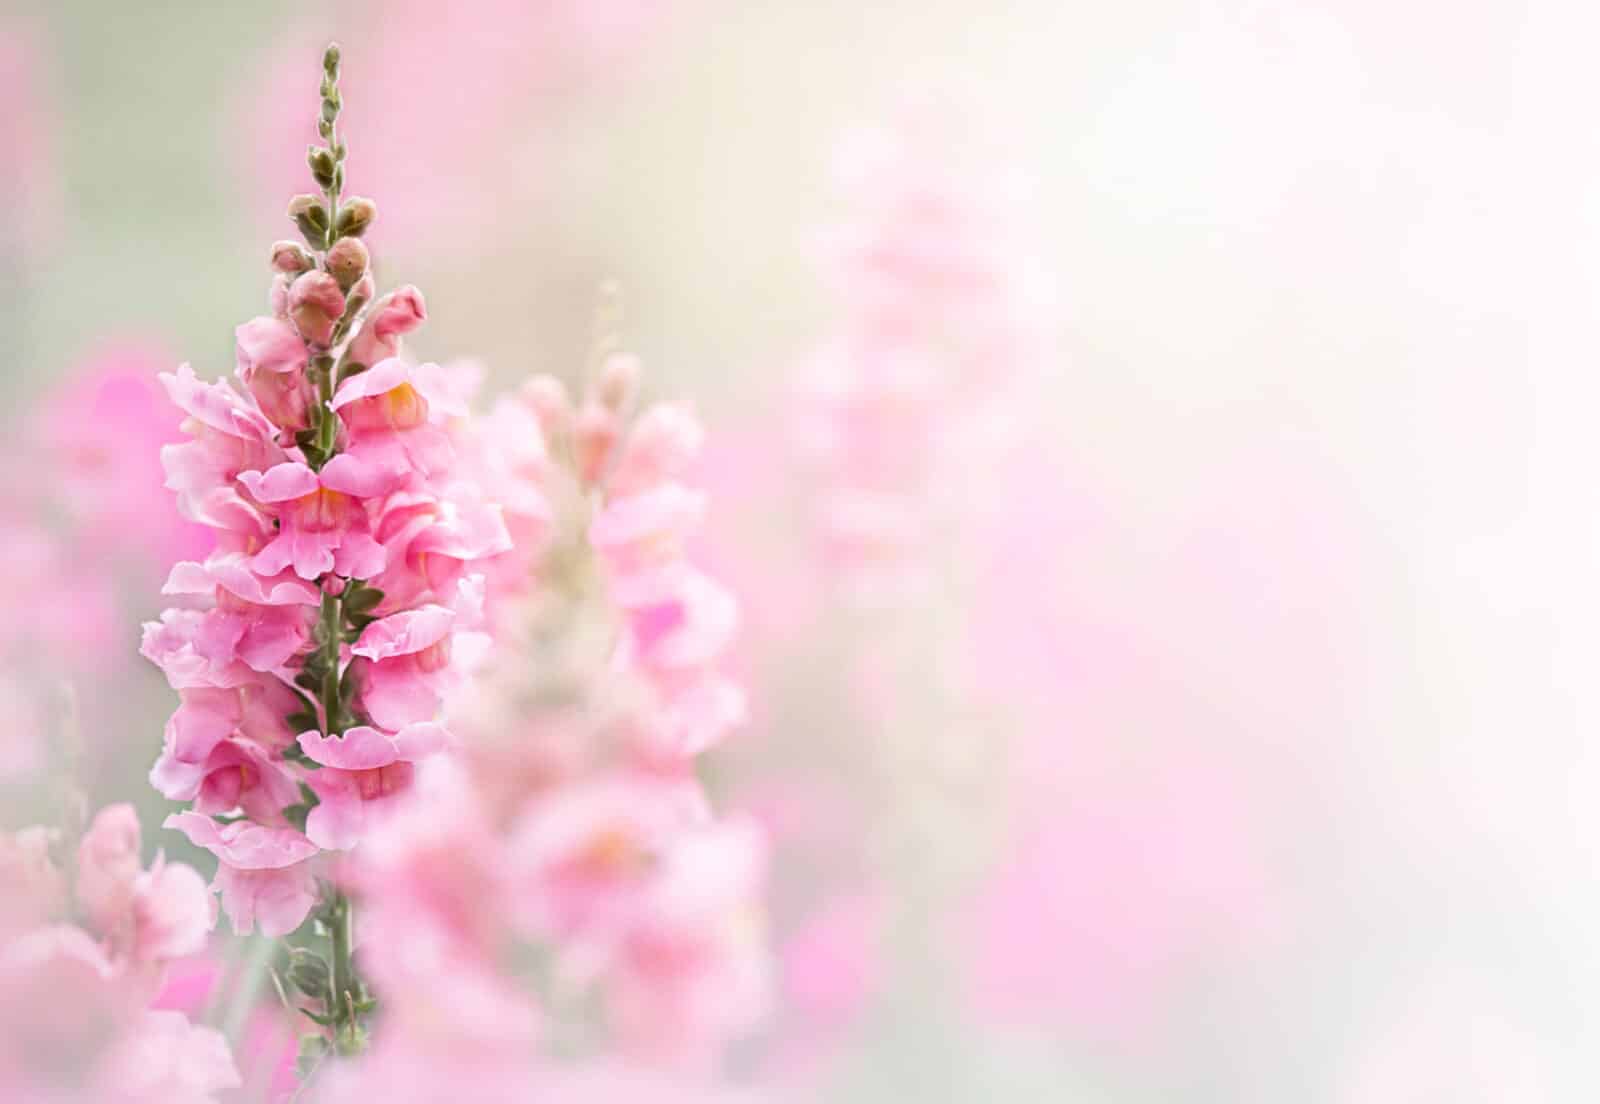
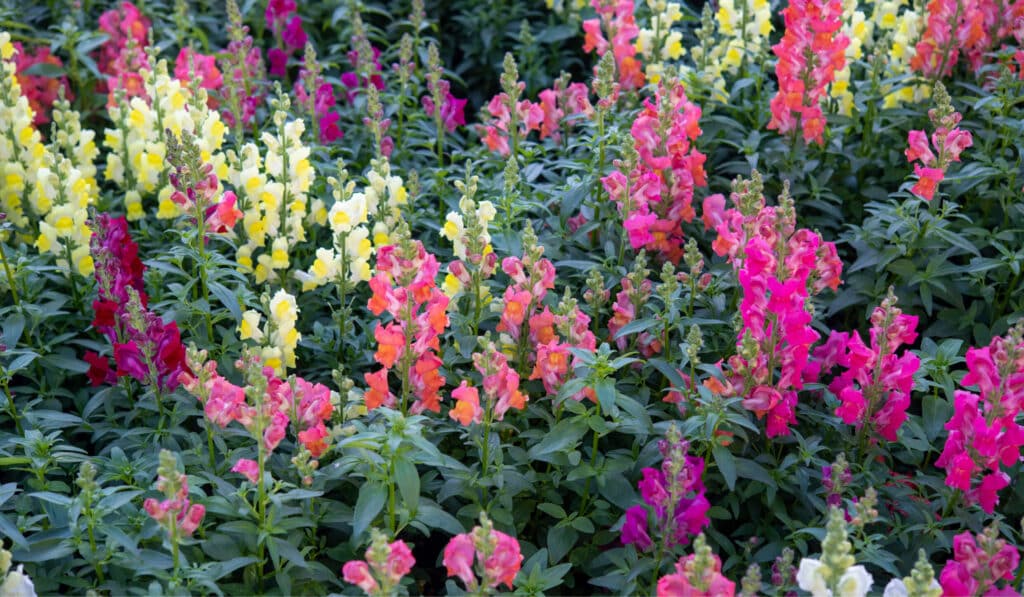
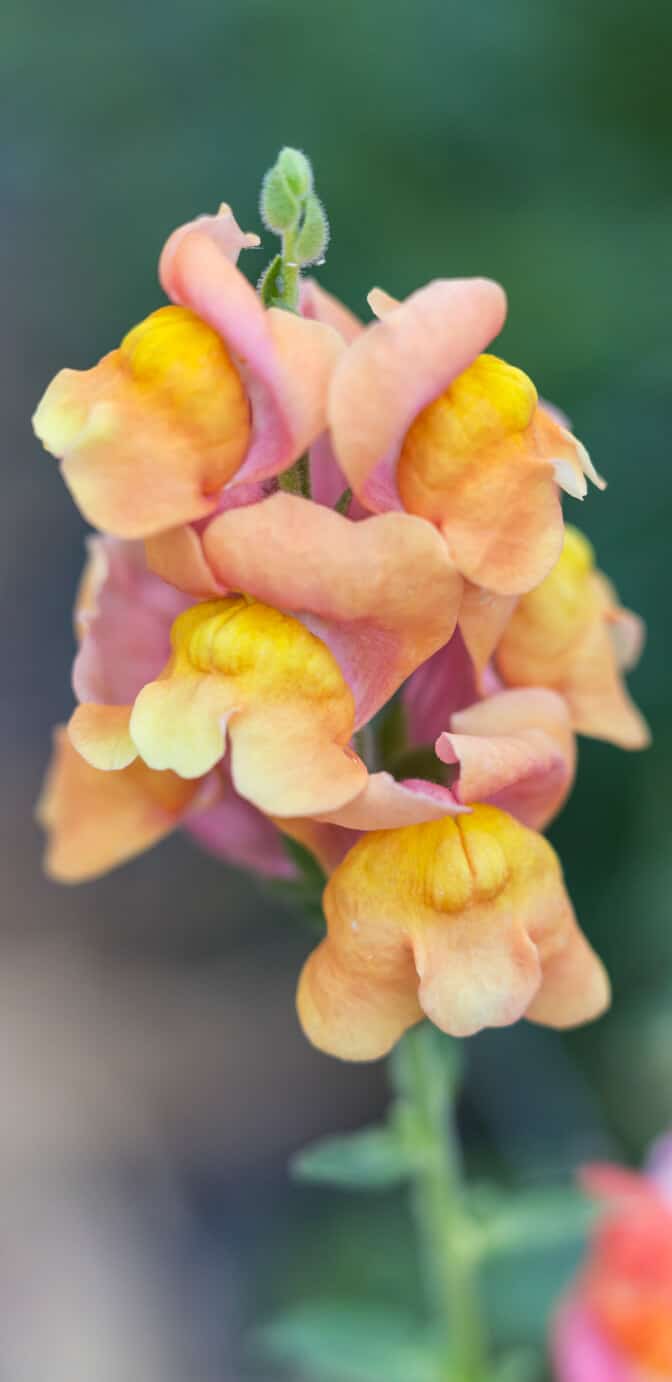
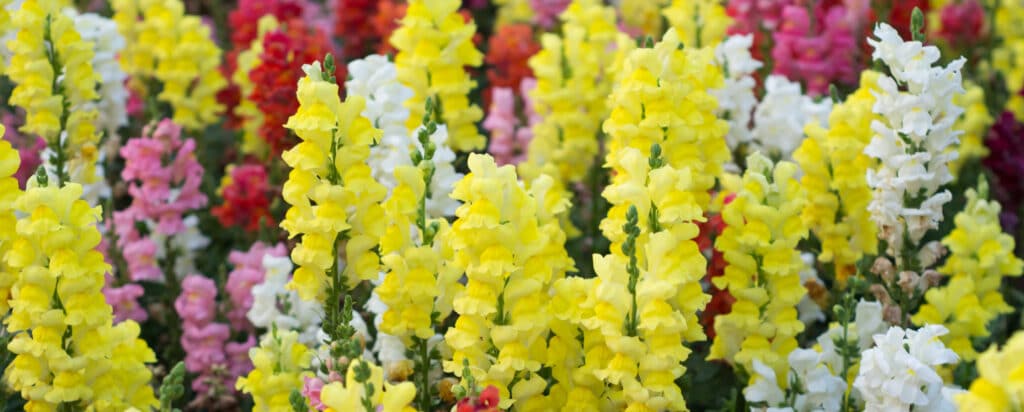
Snapdragons are a beloved choice for cottage gardens and perennial flower beds, adding charm and beauty to any landscape. These flowers possess a unique charm with their dragon-like flower heads and a stunning range of colours including white, yellow, pink, orange, and purple.
For best blooming results, make sure they receive at least 6 hours of direct sunlight daily.
water + feeding
thirsty
Snapdragons are somewhat drought-tolerant and prefer a good drink followed by a period of dryness.
toxic
yes
While Snapdragons are safe for humans they can lead to an upset stomach for furry friends.
size
it depends
Snapdragons come in different sizes depending on the variation. On average, they grow between 1 and 3 feet tall. Dwarf varieties only reach up to 10 inches, while larger species can reach 4 feet.
pro tip
give them room to bloom
Snapdragons like to have a bit of personal space. Make sure to leave about 6 to 12 inches between each plant to provide ample space for them to expand and thrive. Plus, it can actually help prevent the spread of diseases. These aren’t wallflowers—they like a little room to show off their vibrant blooms!
fun fact
snap it open!
The name ‘Snapdragon’ comes from an old superstition that says if you hold the flower by the stem and squeeze it, its mouth will “snap” open and close. They may not actually snap at you, but it’s still a fun way to engage with these beautiful plants! So don’t be afraid to give them a gentle squeeze and watch their petals snap.
Snapdragons thrive in nutrient-rich, well-draining soil like Miracle-Gro® Moisture Control® Garden Soil. For outdoor planting, choose a sunny spot with ample spacing of 6 to 12 inches. In containers, use a pot that is at least 12 inches deep and wide, providing the roots with enough space to expand and thrive. Also, make sure the pot has good drainage to keep those roots from getting waterlogged.
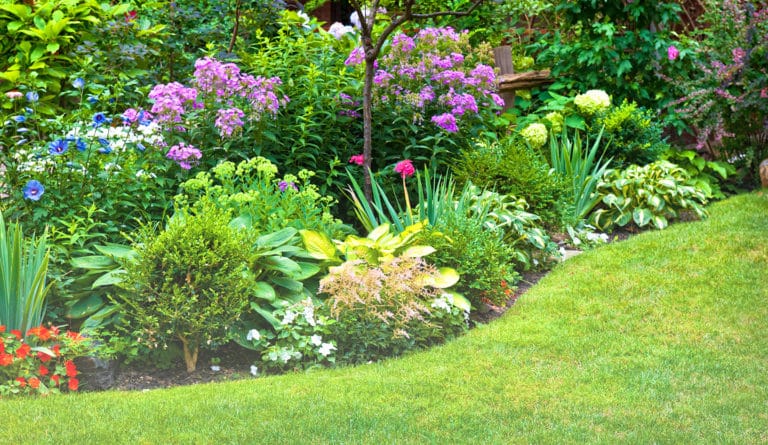
Snapdragons are versatile plants that effortlessly blend into any garden. They complement summer blooms like petunias, lavender, and sunflowers, as well as aromatic herbs like rosemary and sage.
Different varieties of snapdragons have single, double, or frilly petals and come in many vibrant colours. The most common variations are tall snapdragons that feature flowers with broad petals on strong stems, dwarf snapdragons that boast delicate blooms in an array of colours on short stems, and double snapdragons which feature multiple rows of ruffled petals.
Snapdragons generally are resistant to pests, but it’s important to keep an eye out for aphids and thrips. If you happen to spot any of these pests, it’s recommended to employ natural methods such as using an insecticidal soap like Ortho® Bug B Gon® ECO Insecticidal Soap or rinsing the foliage thoroughly with a forceful stream of water to dislodge any potential invaders.
Insufficient sunlight exposure or subpar fertility conditions. To ensure your Snapdragons thrive, ensure your plants receive a minimum of 6 hours of direct sunlight each day. To improve soil fertility, you can enhance it by incorporating a nutrient boost like Miracle-Gro® Water Soluble All Purpose Plant Food. This will enrich the environment for your plants and promote their growth. Also, to encourage the formation of new buds, try deadheading to clear up any withered blossoms.
Fungal disease. This tends to appear in warm and humid climates. To prevent and treat this condition, ensure adequate air circulation between plants by leaving sufficient space when planting, avoid wetting the foliage during watering sessions, and use fungicides if necessary.
Over watering or under watering. Excess moisture can result in root rot, hindering your flowers’ ability to absorb essential nutrients. Conversely, a lack of moisture can cause your flowers to dry out or wither. To ensure optimal growth, carefully assess soil moisture levels and adjust watering practices accordingly.
Insufficient sunlight. To address this, try moving the plant to a spot that ensures 6 hours of sunlight. Additionally, consider pruning the leggy stems and using supports such as stakes or trellises to help the stalks stand tall.
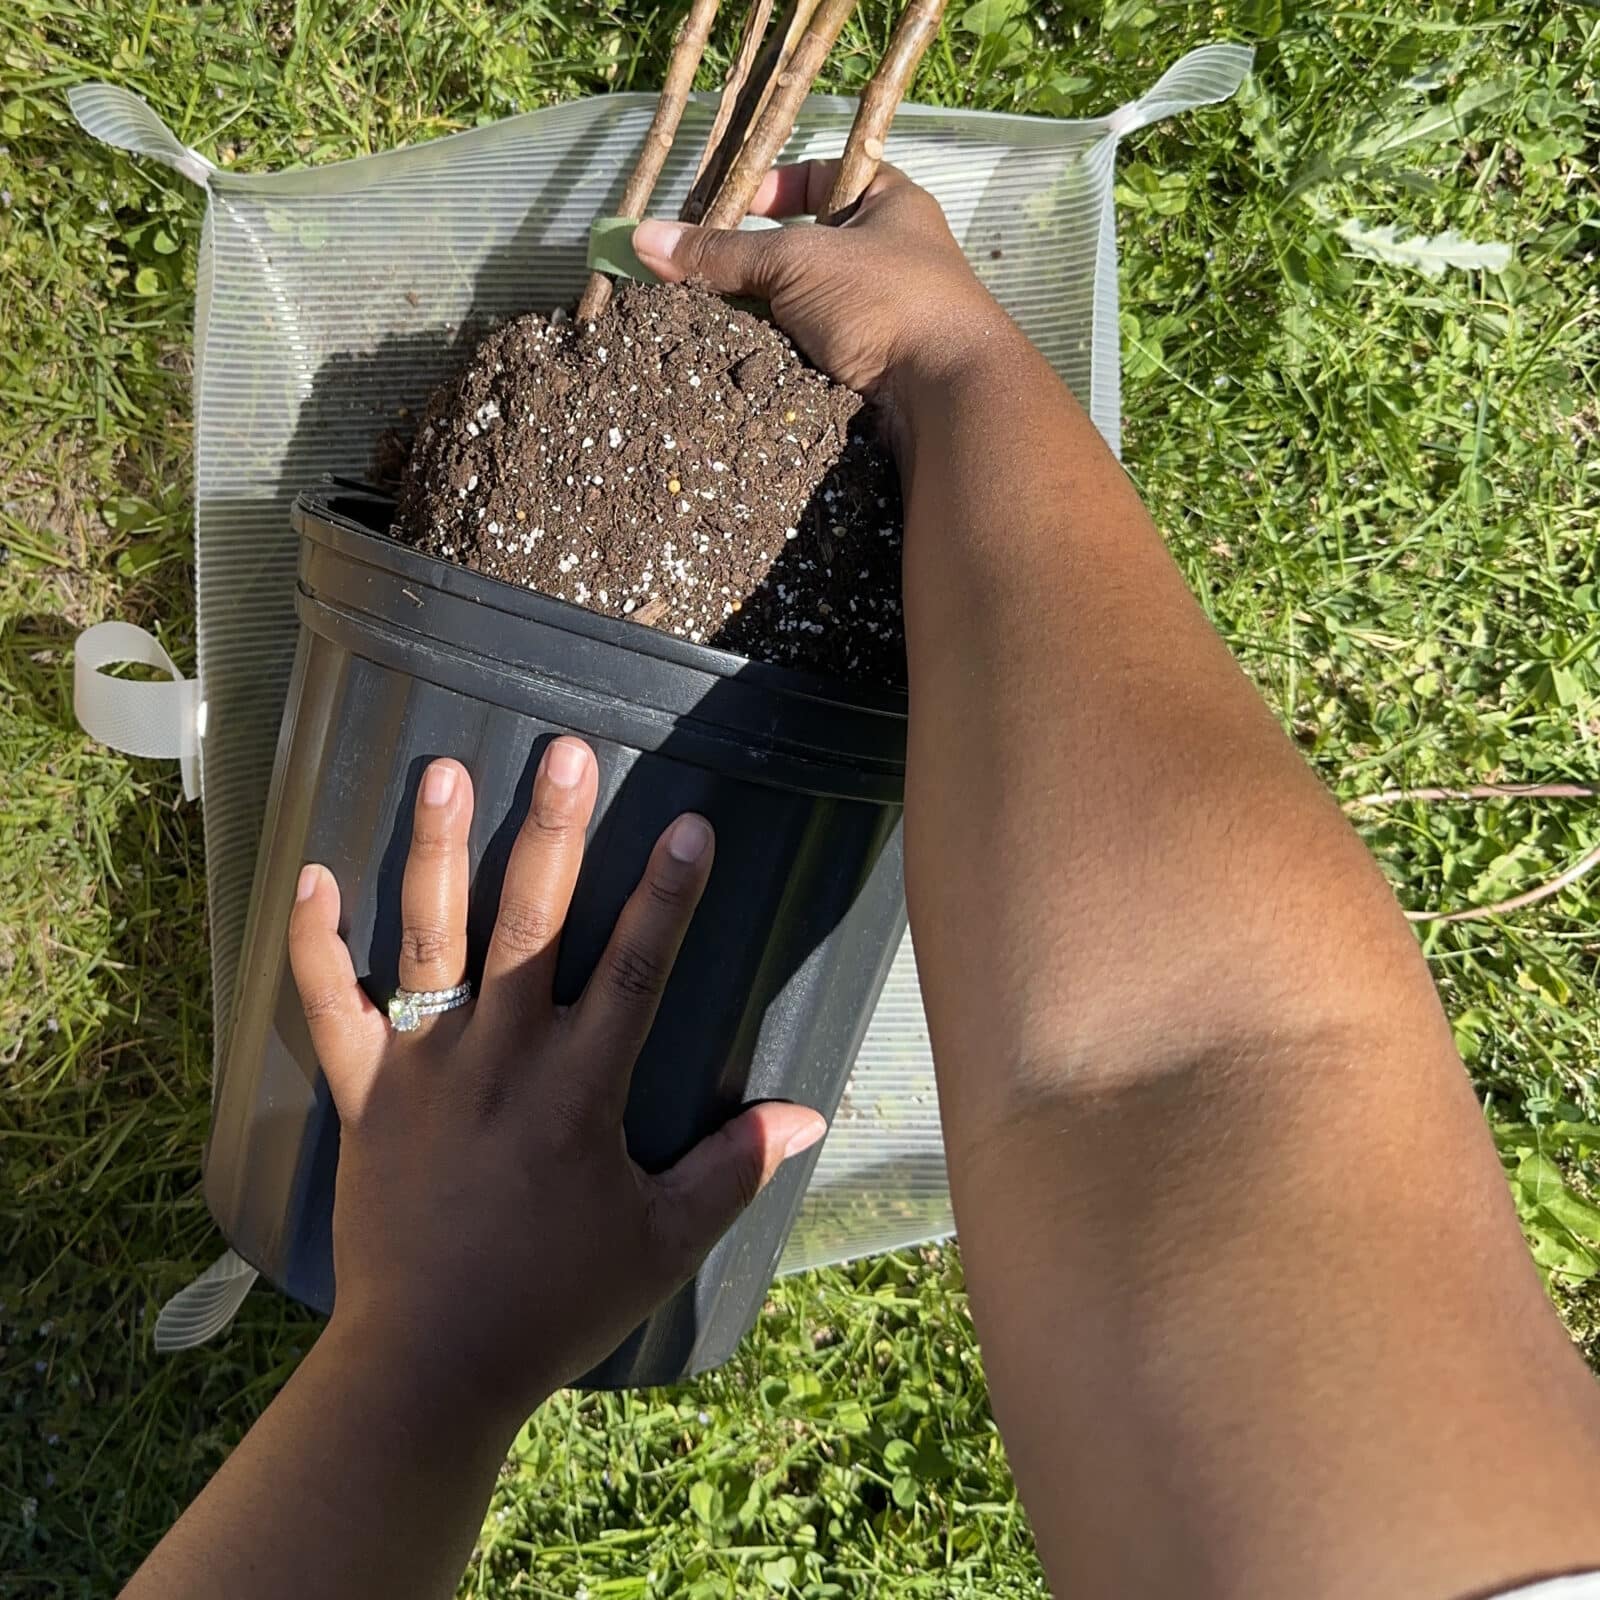
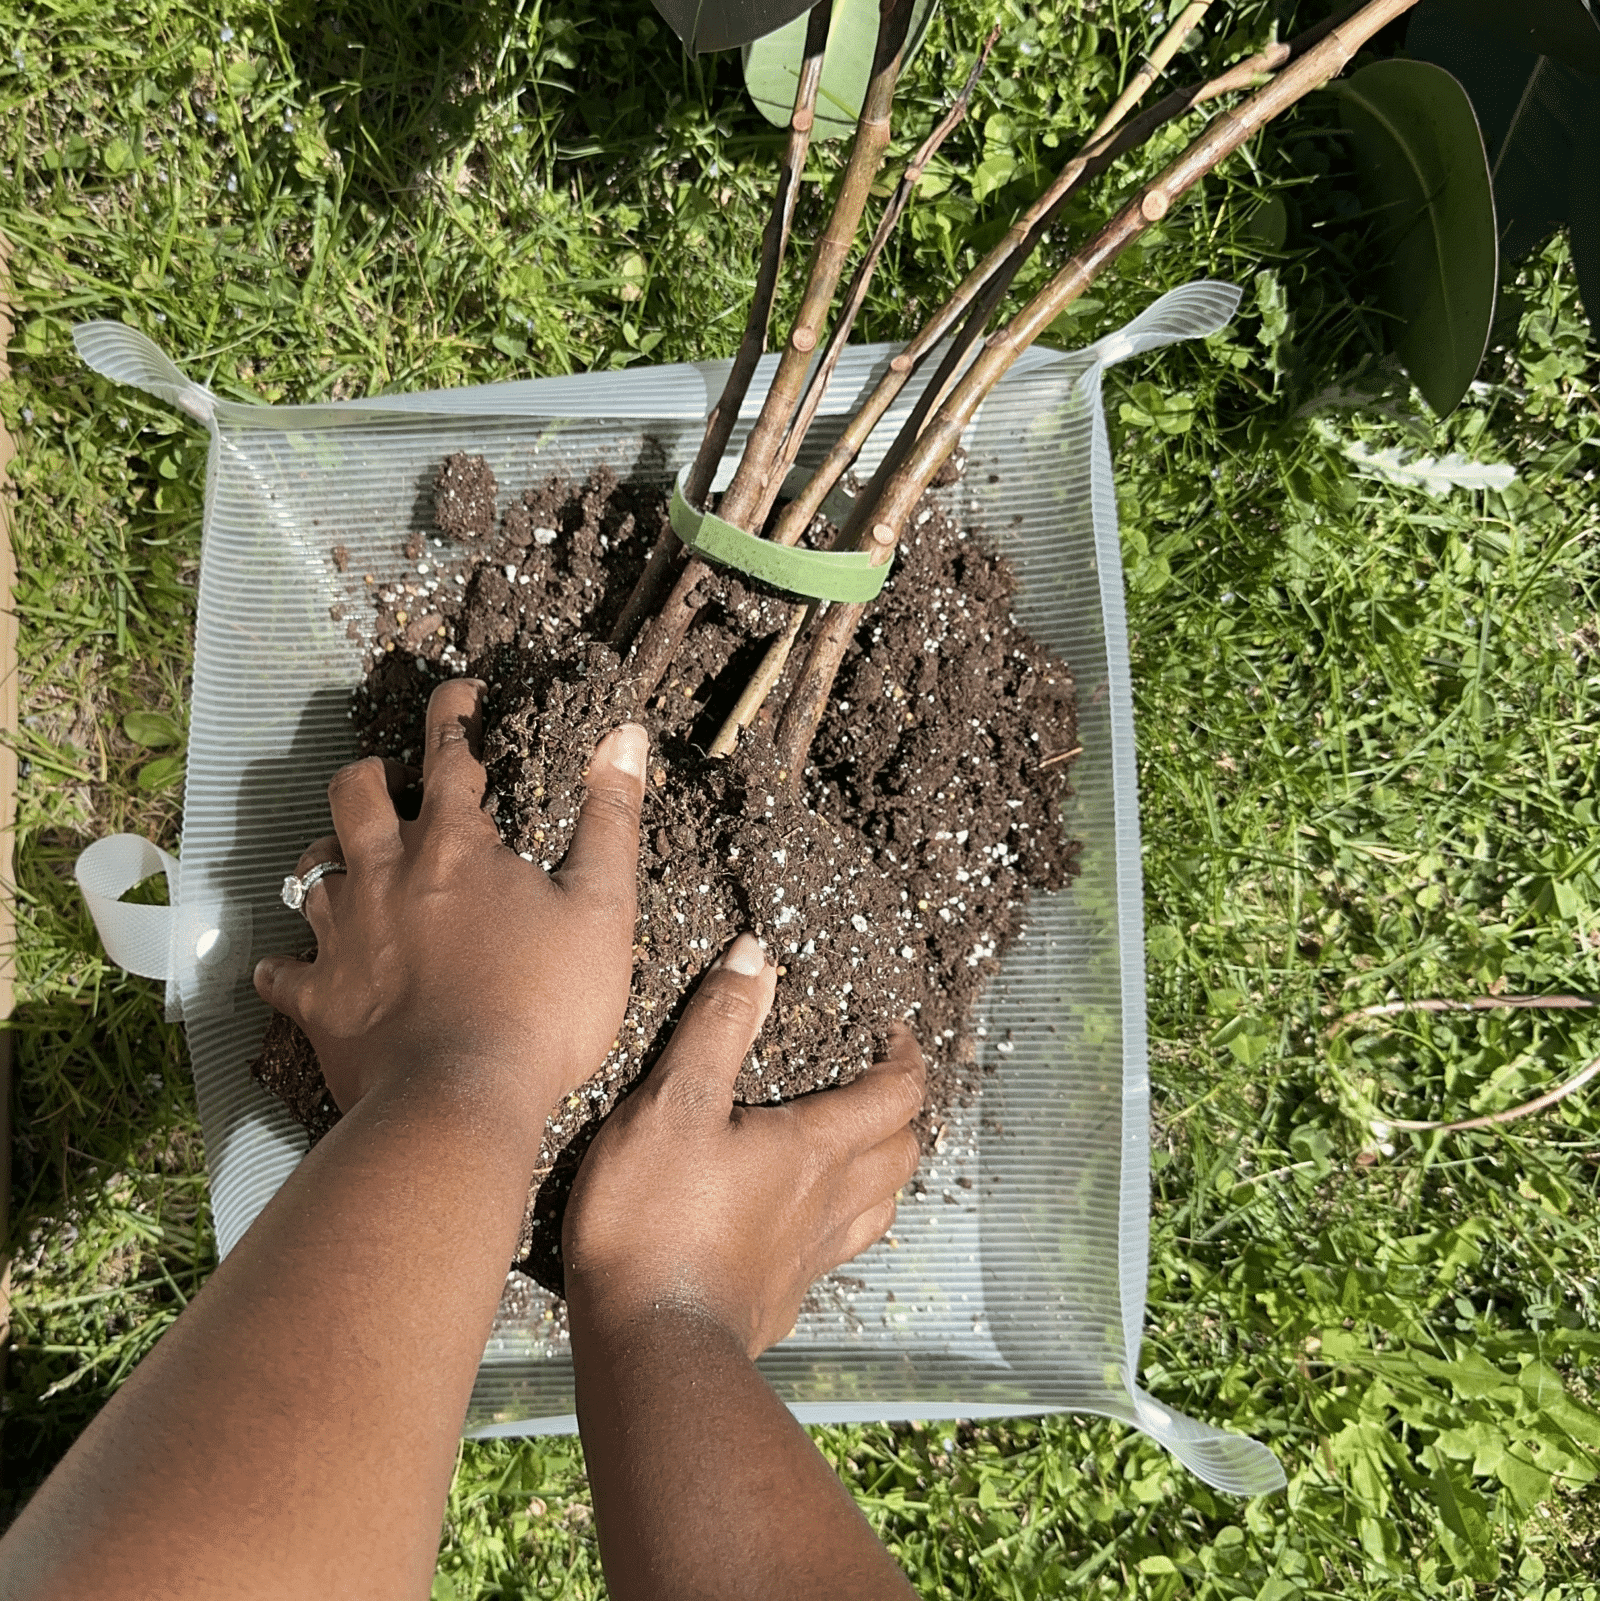
This plant’s been in the same soil since I got it years ago and is due for a repot. Although it hasn’t outgrown its pot, the soil is extremely dry and no longer retains the moisture the plant needs. So here’s how to repot a plant while changing out most of its soil!
The first step is to gently coax the plant out of its pot. I did this by laying to pot on its side and gently squeezing and rolling the soft plastic of the nursery pot. Then pull the plant out of the pot.
step two.
Using your fingers, begin to gently remove some of the old soil from the root ball.
Plants don’t particularly like having their roots disturbed (think about it: how often does someone come along and dig a plant up to tear apart its roots in the wild?) and being too rough can cause damage which can lead to root rot. You do want to remove some soil, though, so the roots can access the nutrients in the fresh new soil.
TLDR, gently remove as much soil as possible while doing as little damage to the roots as possible.
step three.
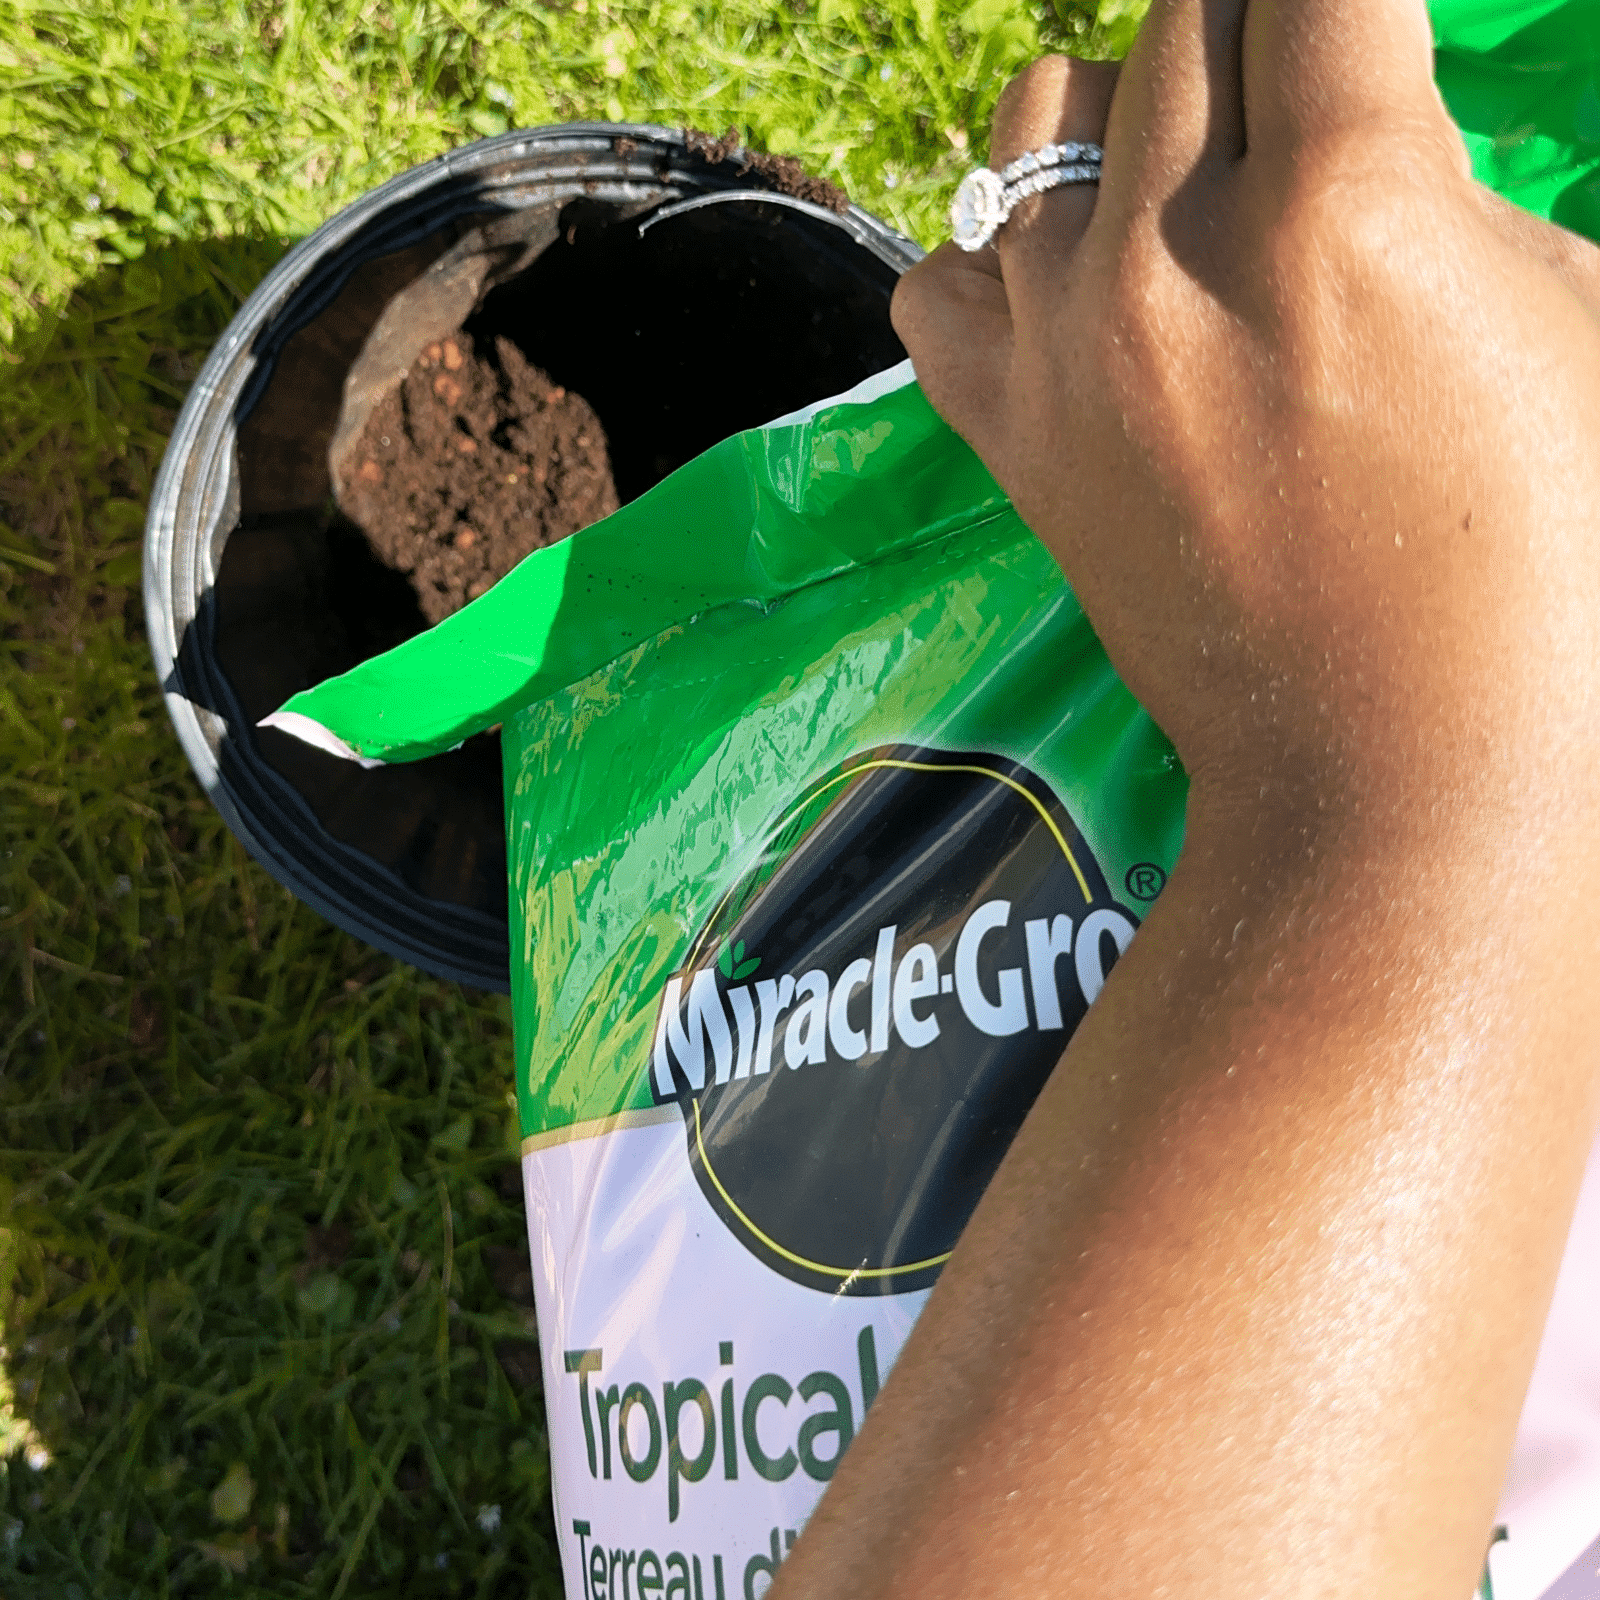
Grab the pot you’re planning to pot the plant in. The rule of thumb is to choose a pot that’s ~2 inches bigger than the root ball. (I decided to plant mine back in the original pot, as it was still an appropriate size, it was just the soil that needed changing.) Fill the bottom of the pot with a couple inches of soil. Then place your plant in and fill the sides and top with soil!
step four.
I like to wait a week or so after repotting before watering the plant. That way, hopefully, any root damage should form a callus and avoid root rot with the additional moisture.
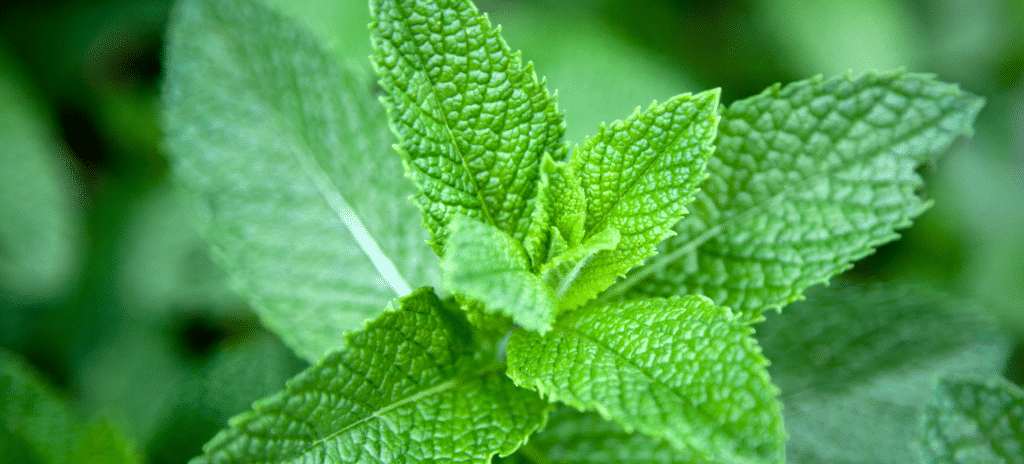
Mint is an easy, fast-growing herb that is used in drink and food recipes. It is a perennial herb that grows little white and purple flowers. There are over 30 different variations of mint, but the most commonly grown is spearmint and peppermint.
Mint does not need to be fussed over which makes it perfect for first-time gardeners. When planting your mint consider using a well-draining soil that can help with moisture control, like Miracle-Gro® All Purpose Garden Soil. This soil helps to prevent from over- and under-watering your mint plant.
Luckily, mint is an easy herb to find companion plants for. You can take your pick of popular home garden veggies such as: carrots, cabbage, kale, tomatoes, bell peppers, beans and even zucchini.
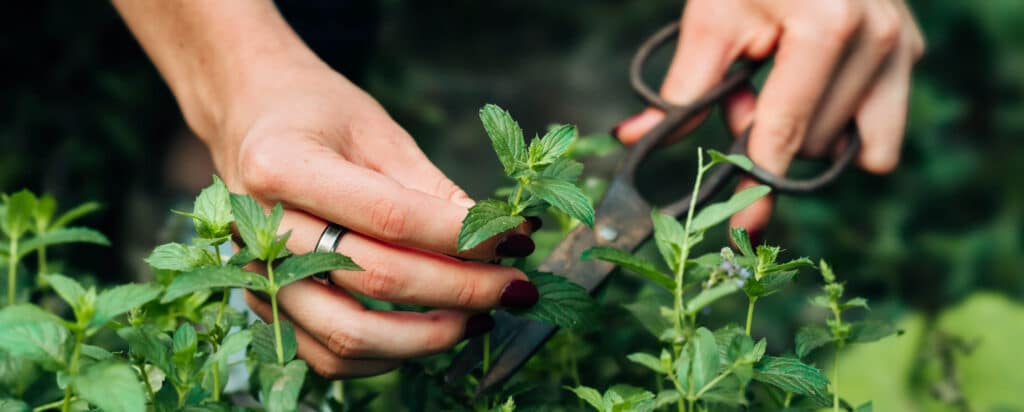
Frequent harvesting is important to keeping your mint flourishing. Young leaves have more flavour than older leaves. With this in mind, you can start harvesting your mint as soon as it comes up this spring.
If you see your mint plant drooping, there might be a pest problem. Common pests you might see with mint plants are aphids, mealy bugs, spider mites, or flea beetles. If you are seeing curling leaves or holes in your leaves, these are tell-tale signs of pests. Don’t worry, there is an easy fix. You can use a gentle insecticide like Ortho® Bug B Gon® ECO Insecticidal Soap Ready-To-Use to safely and quickly get rid of those little nuisances.
Once you pick a few sprigs from your mint plant, you can keep them in water for a few days. It is best to use your mint while it is fresh, about 3-5 days. If you are looking to dry your mint leaves, cut them right before flowering and let the leave air dry. Once dry, store the dried mint in an air-tight container.
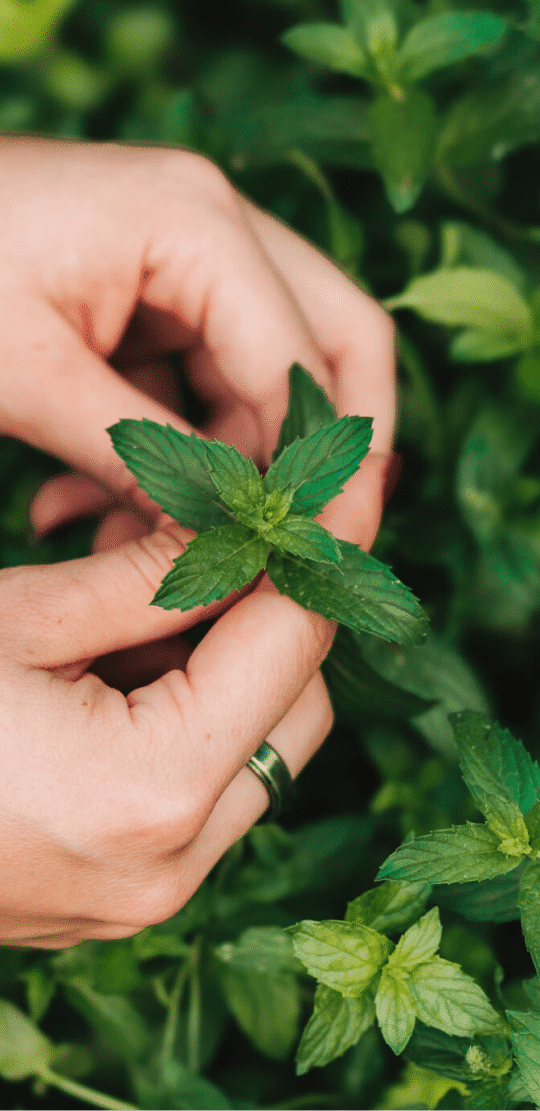
Or you can just pick the leaves from your mint plant as you need them.
More sunlight. Most of the time, if your mint plant is looking thin and leggy it is lacking sunlight or water or nutrients. The best way to prevent mint from getting leggy is to make sure it is growing in a warm spot that gets lots of light. Keep it in a big pot with well-draining and nutrient rich soil.
Under-watering. This is easy to fix. Try watering your mint on a schedule, aiming for once or twice a week. Be sure to water under the leaves and close to the soil so you don’t damage the leaves.
Healthy, ready to use mint is a deep, rich green. If your mint is yellow and falling, it is likely due to its growing conditions. Keep your mint plant in full or partial sun, with a well-draining potting mix like Miracle-Gro® All Purpose Garden Soil. Make sure you water your mint whenever the top of the soil is dry, usually about twice a week.
We use cookies on our website to give you the most relevant experience by remembering your preferences and repeat visits. By clicking “Accept All”, you consent to the use of ALL the cookies. However, you may visit "Cookie Settings" to provide a controlled consent.
This website uses cookies to improve your experience while you navigate through the website. Out of these, the cookies that are categorized as necessary are stored on your browser as they are essential for the working of basic functionalities of the website. We also use third-party cookies that help us analyze and understand how you use this website. These cookies will be stored in your browser only with your consent. You also have the option to opt-out of these cookies. But opting out of some of these cookies may affect your browsing experience.
Necessary cookies are absolutely essential for the website to function properly. These cookies ensure basic functionalities and security features of the website, anonymously.
Cookie
Duration
Description
cookielawinfo-checkbox-analytics
11 months
This cookie is set by GDPR Cookie Consent plugin. The cookie is used to store the user consent for the cookies in the category "Analytics".
cookielawinfo-checkbox-functional
11 months
The cookie is set by GDPR cookie consent to record the user consent for the cookies in the category "Functional".
cookielawinfo-checkbox-necessary
11 months
This cookie is set by GDPR Cookie Consent plugin. The cookies is used to store the user consent for the cookies in the category "Necessary".
cookielawinfo-checkbox-others
11 months
This cookie is set by GDPR Cookie Consent plugin. The cookie is used to store the user consent for the cookies in the category "Other.
cookielawinfo-checkbox-performance
11 months
This cookie is set by GDPR Cookie Consent plugin. The cookie is used to store the user consent for the cookies in the category "Performance".
viewed_cookie_policy
11 months
The cookie is set by the GDPR Cookie Consent plugin and is used to store whether or not user has consented to the use of cookies. It does not store any personal data.
Functional cookies help to perform certain functionalities like sharing the content of the website on social media platforms, collect feedbacks, and other third-party features.
Performance cookies are used to understand and analyze the key performance indexes of the website which helps in delivering a better user experience for the visitors.
Analytical cookies are used to understand how visitors interact with the website. These cookies help provide information on metrics the number of visitors, bounce rate, traffic source, etc.
Advertisement cookies are used to provide visitors with relevant ads and marketing campaigns. These cookies track visitors across websites and collect information to provide customized ads.
join our passionate plant community and gro your garden!
By registering, I am allowing Scotts Canada Ltd. to contact me with news, articles and promotions. I understand that I can withdraw my consent at any time.