
How-To with Once Upon a Bungalow: Window Garden Boxes

Hello plant lovers! It’s Shavonne again, from Once Upon a Bungalow. I love home, DIY, and all things plant-related. Make sure you check out my Instagram here. I’m here on Plant Project Canada’s webpage with instructions on how to build planter boxes to be attached under a window. This was a fairly simple project that made a big impact on my home’s curb appeal.
This project would be suitable for a beginner woodworker and fun for any skill level. Check out the reel for this project on Instagram, TikTok, or Facebook. Let’s get started!…


Materials You’ll Need
- Pressure Treated Wood Deck Board 5/4” x 6” x 8’-0”
- Natural Pine Laminated Shelf 0.7” x 15.25” x 96”
- 1” x 4” x 8’-0” Lumber (I just used scrap wood I had kicking around)
- Plastic Flower Box Inserts
- Galvanized Steel Wire
- Tape Measure
- Pencil
- T-Square, carpenter’s square, straight edge or ruler
- Various sizes of clamps
- Sandpaper
- Stain
- Paint
- Exterior wood varnish
- Foam paint brush
- Wood Glue
- Brad Nails (1”)
- 3” Screws
- 1 ¾” Screws
- ⅜” Drill bit
- Workbenches or a work surface
- Saftey glasses
- Hearing protection
- Mask
Tools
- Table Saw
- Mitre Saw
- Brad Nailer or Pin Nailer
- Power Drill
- Level
- Electric Sander (Optional)
Plants (Used in the images in this article)
- Celosia Flower (Cockscomb)
- Vinca Major (Greater Periwinkle)
- Chrysanthemum (Garden Mum)
- Heuchera (Coral Bells)
- Centaurea Ragusina (Silver Swirl Dusty Miller)
- Cupressus Macrocarpa ‘Goldcrest’ (Lemon Cypress)
- Purple Fountain Grass (Pennisetum Setaceum ‘Rubrum’)
The following instructions are to make one planter box.
Step 1: Make the First Cuts
Start with the pressure-treated wood deck board 5/4” x 6” x 8’-0”. Using a tape measure, measure up from the bottom of the board 35”. Mark this measurement with a pencil, and then use a carpenter’s square to make a straight line. Cut this marking with a mitre saw at a 90-degree angle. Repeat this process four times to create four pieces that measure 35”. These will be the pieces used for the front and back of the box.
Using the remaining pressure-treated wood deck board, cut four more pieces at 7”. To do this, mark the 7” measurement with a pencil, and use a carpenter’s square to make a straight pencil marking. Cut this marking with a mitre saw at a 90-degree angle. Repeat this process four times to create four pieces that measure 7”. These will be the pieces used for the sides of the box.
Next, using scrap lumber or 1” x 4” x 8’-0” Lumber, cut four 1” x 1” x 6” pieces using the same method explained above. These four pieces will be the wood that attaches and holds the front and back pieces together.
Refer to the images below.


Step 2: Attaching the Front and Back Pieces
Using a clamp, secure the two front pieces together. These are the boards that were cut to 35”. Ensure they are flush along their edges when placed beside one another before clamping tightly. Place the 1” x 1” x 6” piece along the edge of the two pieces, using the 7” piece of decking board placed perpendicularly to the 35” board as the guide for placement. Using two clamps, secure this piece in place. Using a drill, pre-drill two holes into each side of this piece. Then, use a power drill and 1 ¾” screws to secure this in place.
Refer to the images below.


Step 3: Attaching the Side Pieces
Using a clamp, secure the 7” piece flush and perpendicular behind the 35” piece, making sure that the back of the 7” piece is tight against the side of the 1” x 1” piece. Using a drill, pre-drill two holes into this piece from the face of the box, down into the side pieces. Then, using a power drill, secure these pieces using 1 ¾” screws. Next, place the other 7” piece beside the 7” piece that is already attached. Use a clamp to make sure this piece is tight up against the other 7” piece and is flush and perpendicular to the face of the box. Pre-drill and screw to attach.
Refer to the images below.


Step 4: Making the Box
Flip the back of the box onto the top of the box with the sides attached. Pre-drill four holes into each of the sides, and then secure using 1 ¾” screws. The base of the flower box has been created.
Refer to the images below.


Step 5: Cutting and securing the bottom of the Box
Using 1” x 4” x 8’-0” Lumber or scrap wood of the same thickness, cut three pieces to a 7” measurement using a mitre saw. These pieces will create the shelf on which the Plastic Flower Box Inserts will sit. Place one 7” piece in the middle of the bottom of the box. Place the other two tight to each side. Ensure pieces are flush with the bottom of the box. Pre-drill two holes on each side and then fasten with two 1 ¾” screws on each side. The bottom of the box is left open to allow drainage and reduce the risk of the wood swelling that can be possible with watering.
Refer to the images below.


Step 6: Cutting and Attaching the Trim Pieces
The next step of the project is to cut the trim pieces. These will cover the screws that are showing on the exterior of the box from constructing the garden box. Ensure that you cut the initial pieces a little longer than the following measurements, allowing for room for error and editing. Using the Natural Pine Laminated Shelf 0.7” x 15.25” x 96”, rip strips on a table saw into 1 ½” strips and ¾” strips lengthways. Once the strips are cut, proceed to make the following cuts below using a mitre saw.
Cut list:
- Front Sides: 1 ½” x ¾” x 6 ¼”
- Top Front 1 ½” x ¾” x 36 ½”
- Top Sides 1 ½” x ¾” x 7 ¾”
- Front Bottom ¾” x ¾” x 36 ¾”
- Bottom Sides ¾” x ¾” x 8 ½”
- Back Sides 1 ½” x ¾” x 6 ¼”
Once these cuts have been made, make a light pencil mark of where the screws in the project are already located. Make sure the pencil marking is visible even after the trim is placed for attaching. This will give direction on where the screws on the garden box are located to ensure that a brad nail does not hit a screw. Then, use a thin bead of wood glue, and then attach with 1” brad nails to the planter box. There will be no trim around the back side of the planter. Refer to the images below.


Step 7: Stain and Seal
Sand any sides of the project that feel rough by hand using sandpaper or an electric sander. Stain the preferred colour, inside and out. Seal with a water-based polyurethane sealer inside and out for extra water protection.
Refer to the images below.


Step 8: Attach under the window
To attach to the window, first use a mitre saw to cut two 7” pieces of 1” x 4” x 8’-0” Lumber or scrap wood. These pieces will be anchored to the exterior of the house. This allows for the window boxes to be jutted out slightly from the house so there is allowance for water to drain through and not sit at the edge of the window sill. Pre-drill two holes into the 7” pieces and then anchor with 3” screws to the side of the house. Use a level to ensure these pieces are level. Once the two 7” pieces have been anchored, place the window box against them, pre-drill a hole in the back piece of the window box, and then proceed to anchor it with a 3” screw. Once there is one screw in one side, use a level to make sure the box is level with the window, and anchor the other side. Use two 3” screws on both sides.
Refer to the images below.


Step 9: Planting
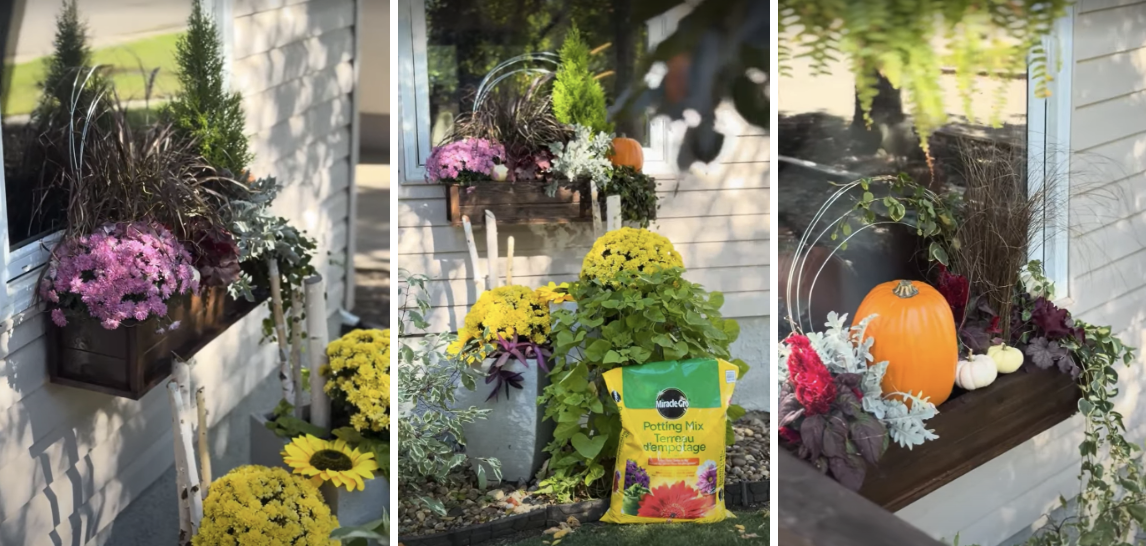
Now for the fun part! Designing the garden boxes. This was a fall project, which meant fall mums and pumpkins were a must.
The “Spiller, Filler, Thriller” rule is something to keep in mind when planting garden boxes. It’s a simple rule of thumb to design balanced plant containers. The thriller is the tall, eye-catching plant placed toward the center or back of the container. The fillers are shorter, fuller plants that surround the thriller and add colour and texture. The spillers grow over the edge of the container, creating a cascading effect and making the arrangement look more finished.
In the planters, Miracle-Gro All Purpose Potting Mix was a clear choice! It provides a lightweight, nutrient-rich growing medium that helps plants establish strong roots and grow healthily. It also has good moisture retention and drainage. Remember that using a quality potting mix can also help give plants a consistent growing environment throughout the season.
The plants used in the images below are Celosia Flower (Cockscomb), Vinca Major (Greater Periwinkle), Chrysanthemum (Garden Mum), Heuchera (Coral Bells), Centaurea Ragusina (Silver Swirl Dusty Miller), Cupressus Macrocarpa ‘Goldcrest’ (Lemon Cypress), Purple Fountain Grass (Pennisetum Setaceum ‘Rubrum’).
I used galvanized steel wire to make large metal loops for the vines to wrap around and to add extra visual interest to each arrangement. Be sure to always complete your project with solar-powered twinkle lights for even more magic and whimsy.


Project Complete!
I think these turned out absolutely stunning, and I’m so happy with how they came together! There’s something so special about adding window boxes to a home—they instantly bring colour, texture, and a little extra personality to the space. I also love that these boxes can be completely transformed throughout the year. From bright and colourful blooms in the spring and summer to cozy seasonal combinations in the fall, there are so many fun ways to change them up and keep them looking fresh throughout every season.
I hope this project has inspired you to look at your own outdoor spaces a little differently and maybe even try creating a window box of your own. Gardening is such a fun way to get creative, and there really are no limits when it comes to choosing plants, colours, and combinations that reflect your personal style.
If you’d like to see the full process, be sure to check out the video for this project here. And if you decide to create your own window boxes inspired by this project, we would absolutely love to see them! Be sure to tag @plantprojectcanda and @onceuponabungalow so we can follow along and see your beautiful creations. There’s nothing better than seeing how everyone puts their own unique spin on a gardening project!
Thank you so much for following along and letting me share these little gardening projects with you. I hope this inspires you to get outside, get your hands in the soil, and create something beautiful of your own.
Until next time,
Happy gardening! 🌿🌸
Shavonne