DIY planter boxes
Hello Everyone! My name is Shavonne and I’ve popped over to Plant Project Canada’s webpage
from Once Upon a Bungalow with instructions on how to build planter boxes with a stunning
blooming trellis archway. This is a great beginner woodworking project and the final result will
have you beaming with pride.
If you already have two planters that will work for this project and only want to build the
archway, scroll past the planter instructions to find the arch instructions. However, if you’re like
me and love a good DIY project, follow along with these instructions to build the planter boxes
too!
Here we go!
Here’s what you’ll need:
These planter boxes are ideal for raised vegetable gardening as they are deep and have ample soil space for your rooted vegetables to thrive.
The below instructions will build two planter boxes. Each finished planter box will bed 39” W x 26 ½” H x 26” D. I used non-pressure-treated pine to create my planters, but this can be substituted for any ideal preferred type of wood. Start by cutting all the pieces first, to save time throughout the build.
materials:
– 1 ¾” Deck Screws
– 2” Deck Screws
– 1 ¼” Brad Nails
– 32 Pine Fence Boards (1”x 6” x 6’-0”)
– 6 Pine Boards (2” x 2” x 8’-0”)
– Sandpaper
– Wood Glue
– Wire Mesh
– Stain and or Paint
tools:
– Table Saw
– Mitre Saw
– Brad Nailer
– Tape Measure
– Various Clamps
– Electric Sander
– Jig Saw
– Speed Square
– Pocket Hole Jig (Optional)
– Staple Gun
cut list:
– 8 2×2’s at 26” (Leg’s)
– 4 2×2’s at 22” (Side Supports)
– 4 2×2’s at 22 ½” (Bottom Supports)
– 4 2×2’s at 20 ¼” (Bottom Supports)
– 24 Fence boards at 35” (6” width) (Long sides & bottom of the planter)
– 16 Fence boards at 24” (6” width) (Short sides of the planter) *Tip: Use a table saw to cut the following pieces at 2 ½” width first, for less material waste.
– 16 Fence board pieces at 26” (2 ½” width) (Side Trim)
– 4 Fence board pieces at 38 ¾” (3” width) (Top Trim)
– 4 Fence board pieces at 26” (3” width) (Top Trim
step 1.
Making the long sides of the planter box: Take 4 of the 35” fence boards and lay them out on a flat surface. Use clamps to press the four fence boards together for an even and taught placement. Place the 26” 2×2’s on either end of your 4 boards, with the top of the 2×2 flush with the top of your planter—the remaining length of the 2×2 will overhang. Use wood glue on the back of the legs. Use clamps to secure the legs in the right position before anchoring them with screws. Once the legs are in place, pre-drill holes and then use 1 ¾” deck screws to secure the legs. Find the center position using a tape measure, and place the 22” middle support using the same process of wood glue, clamps, pre-drilled holes, and screws. Repeat step one 4 times. See the images below.
step 2.
Attaching the short sides of the planter box: Lay one of the completed “long sides” on a flat surface to begin attaching the 24” fence boards to the 2×2 leg on the “long sides” assembled in step one. Attach these boards flush, use wood glue, pre-drill the holes, and then secure with 1 ¾” deck screws. Continue attaching until all four 24” pieces are attached. Once complete, attach the other completed “long side” to the other end of the 24” piece. Complete the box by adding the 4 remaining 24” pieces to the opposite end. Use a speed square to ensure all corners of the box are at a 90-degree angle. See the images below.
step 3.
Bottom supports: Measure 8 ½” over on the “long side” from each 2×2 leg. Attach the 22 ½” 2×2’s from the outside by using wood glue, pre-drilling, and then using 2” inch deck screws. The 22 ½” boards may have to be trimmed to fit in this space (That’s okay!). There will be another support between the legs of each of the “short sides” of the planter. The 20 ¼” 2×2’s should fit snuggly between the two legs. Use a pocket jig to pre-drill the holes to attach these, or toenail screw from the front side. See the images below.
step 4.
The planter’s bottom: Using the remaining 35” fence pieces, place one piece in the base of the planter box. Press these boards up against the sides until they are snug. Mark where the legs butt up against the fence piece. Mark these locations with a pencil on the fence piece. Measure the length that the leg protrudes into the box and measure this distance onto the fence piece. Use a Jig Saw to cut out these notches. There may be space between these boards, which is okay, as it will allow for drainage in the planter. See the images below.
*Note: Once I was at this stage of the build, I took the time to stain the planter box with an outdoor deck stain. I then painted the side trim pieces in black before attaching them to the planter boxes. * Tip: Having a friend with you helps speed up the process! See the images below.
step 5.
Side trim pieces: Attach the 26” side trim pieces using wood glue and 1 ¼” brand nails. Place the first trim piece on the “short side” flush with the edge. The piece should sit flush with the ground and flush with the top of your box. Then place another trim piece on the “long side” of the planter, glue, and then brad nail. Repeat this process on each corner of the garden box. Use wood filler to fill in all brad nail holes, sand, and then touch up paint. See the images below.
step 6.
Top trip pieces: Cut the 26” fence pieces with a 45-degree angle to frame the top of the garden boxes. Using wood glue and a brand nailer, attach each of the pieces, only after arranging all 4 pieces on the top to ensure an even trim for the top of the planter. Use wood filler to fill in all gaps and brad nail holes, sand, and then touch up the stain of the top trim. See the images below.
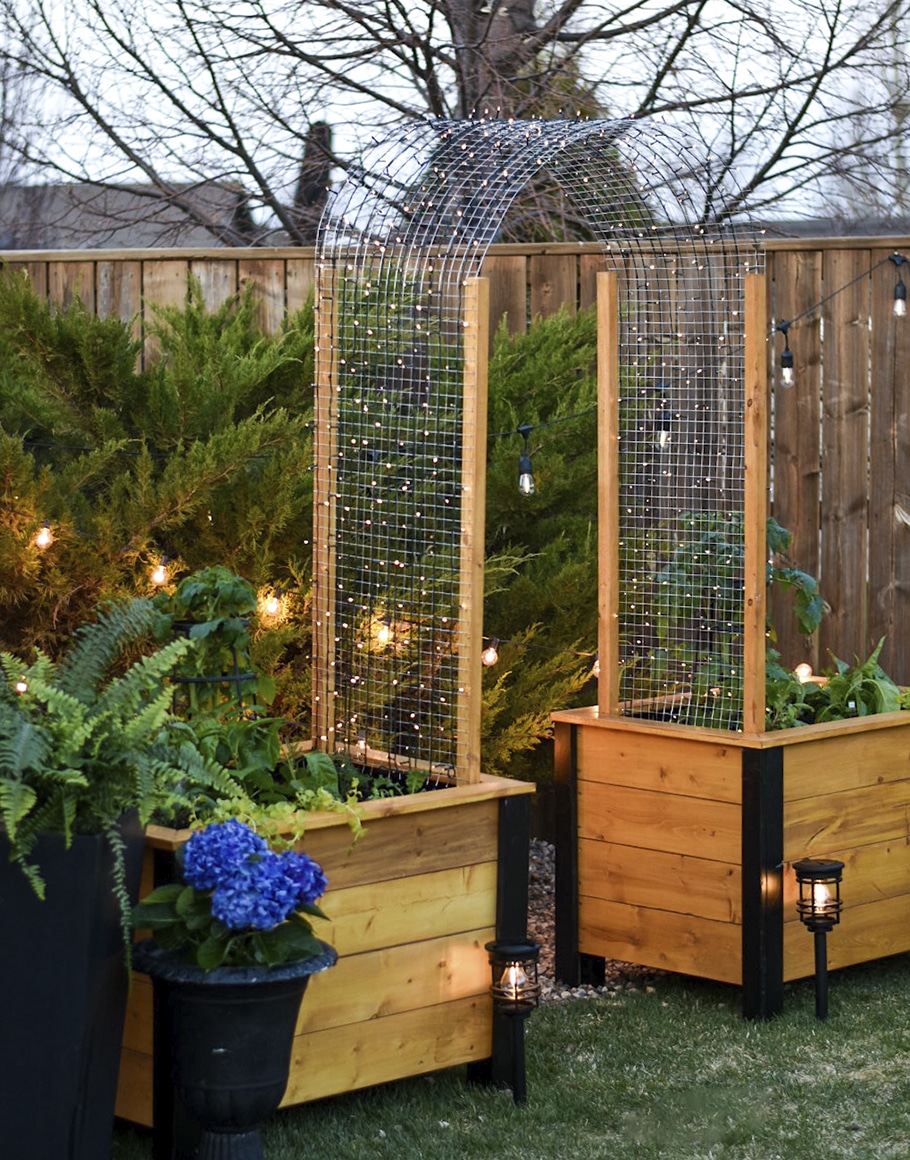
DIY planter boxes arch trellis
step 1.
Creating the supports: Cut 2×2’s at the desired height. 62” inches is the height of the supports shown in the image below. Stain or paint the supports to match the design cohesively. Attach supports to the 2×2 legs inside the planters using 1 ¾” deck screws. 3 screws in each support should be sufficient. See the images below.
step 2.
Adding the wire mesh: Measure the distance between the two supports. Using that measurement cut the wire mesh to size. Start below the trim of the planter box and attach the wire mesh to the supports using construction staples. Remember, the mesh doesn’t have to go all the way down into the box, it just has to begin at soil level.
step 3.
Light it up: Using solar lights, string the lights over the archway to create a stunning glowing effect in the early months of spring before the trellis fills in with your gorgeous climbing plants.
DIY planter boxes with arch trellis tips & tricks:
- Fill the planters with sticks, grass clippings, and leaves before adding the soil. This will naturally enrich the soil over time and it will take up space in each planter, costing less to fill.
- Use both Miracle-Gro Garden soil and potting soil. Using a 50:50 blend of these two soils will provide a lighter, more suitable mix for raised bed plants to thrive.
- Use Miracle-Gro Shake n’ feed to give your garden a boost and remember to fertilize every week as this makes all the difference.
I’m so honoured to be a guest on Plant Project Canada’s blog, and I look forward to seeing all of
the planters and trellises you create! Be sure to tag me in your creations. Thank you for stopping
by!
Xo Shavo
Follow Shavonne on Instagram and TikTok
#happycreating!