
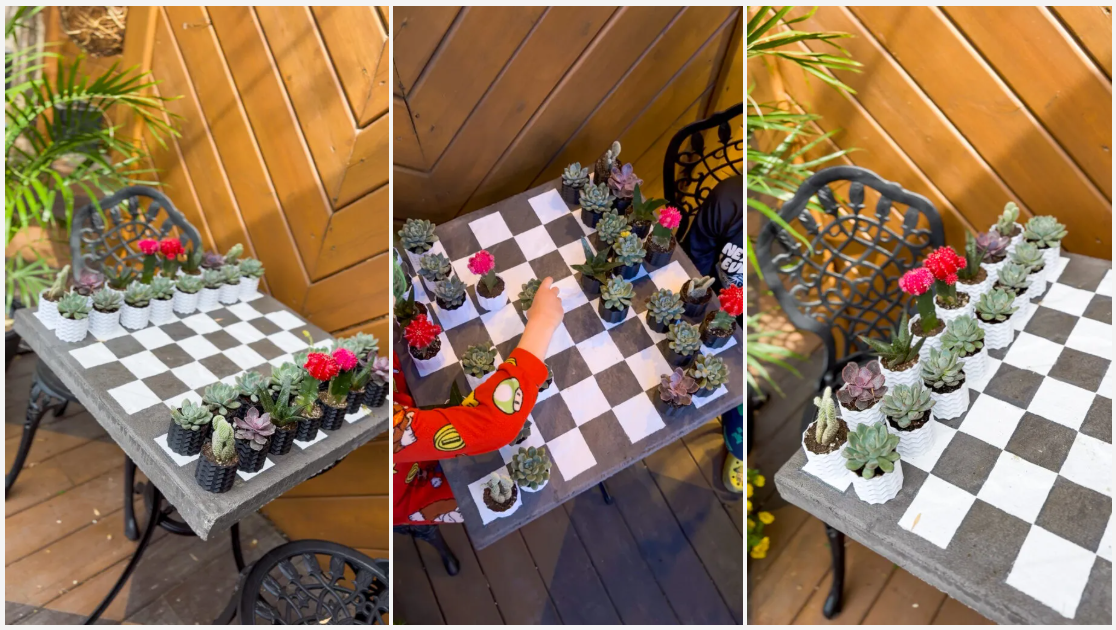
How-To with Once Upon a Bungalow: DIY Living Chess Set

Hello Everyone! My name is Shavonne, and my social media channels are called Once Upon a Bungalow. You can find me on Instagram, TikTok, Facebook, or YouTube. I am excited to be here on Plant Project Canada’s page to give you a step-by-step tutorial on how I created a Chess Set made to make any plant person happy. Even if you don’t want to play chess, this still makes for the perfect backyard garden display, where the plants become the pieces. It will be sure to strike up conversation and add whimsy to your yard this summer.
Here we go!…


Materials You’ll Need
Main Structure:
- Cast iron bistro table and chairs. (Check your local marketplace for a set that you can repurpose)
- Metal spray paint/sandpaper, if you desire to paint the bistro set
- 1 square paving stone that covers the service of the table you are using (The size that fit my bistro set was 2 ft × 2 ft)
- Exterior paint in the desired colour of the chessboard
- Painter’s tape
- Exterior clear sealer
- Pencil
- Carpenter’s square or ruler
- Measuring tape
- Construction adhesive
- Optional – Exterior adhesive felt pads for pot bottoms
For the Chess Pieces
- Miracle-Gro® Cactus, Palm, and Succulent Potting Mix
- 32 small planters or containers
- Matching terracotta pots work well
- Cups, mini planters, or thrifted containers also work
- 3D printed plant pots printed to size
Plants
Choose plants with different heights, textures, and personalities so each piece is easy to identify. Have fun selecting the perfect plants for the pieces, and make sure they mimic the vibe of their traditional chess counterpart. Introduce colour to add more whimsy and magic to your chess set!
The plants that were utilized in my chess set were:
- Pawns: Small Echeveria Succulents
These succulents form tight rosette-shaped leaves. They thrive in bright light and well-draining soil. Allow the soil to completely dry between waterings to keep these looking beautiful. - Rooks: Bunny Ear Cactus (Opuntia microdasys)
These feature flat oval-shaped green pads that grow in pairs, resembling rabbit ears. These cacti require bright, direct sunlight to maintain their compact shape. Allow the soil to completely dry out before watering thoroughly. - Knights: Echeveria ‘Purple Pearl’
These plants have a stunning purple hue. They can become more intensely coloured when exposed to full sun, transitioning from grey-green. They need well-drained soil and require bright indirect light. - Bishops: Gasteraloe
These are a hybrid plant between Aloe and Gasteria. These feature thick, dark, green leaves with raised white spots or bumps. They thrive in bright light, and just like most succulents, need the soil to completely dry before watering thoroughly. - Queen: Moon Cactus (Pink)
These are a novelty plant that is actually two different cacti grafted together. The top colourful part is a Gymnocalycium mihanovichii, with the green stem being a different species used as rootstock. The pink that I used in the chess set creates a dramatic centrepiece for the chessboard. - King: Moon Cactus (Red)
These require bright, indirect sunlight. Water only once soil has completely dried out, and thrives in well-draining soil. Protect these plants from the temperature dropping below 10 degrees Celsius.
Step 1: Prepare the Bistro Table and choose an Area
Choose a flat outdoor space that gets plenty of sunlight. Place the cast-iron bistro set where it will stay most of the season. Since succulents and cacti generally prefer sun and good airflow, a patio or garden corner works well. I chose to use a cast-iron set to ensure the paving stone had a nice, sturdy surface to support the weight. You can use a different base for your chess set, or even have the paving stone sitting directly on the ground.
The bistro set was found on Facebook Marketplace and was in rough repair. I took sandpaper to remove any loose paint or metal. I then used matte black metal spray paint to give the set a refreshed look and a cohesive colour that popped against my wooden deck backdrop.


Step 2: Create the Chess Board
Your paving stone is 24 inches × 24 inches.
Because a chessboard has 8 rows and 8 columns:
24 ÷ 8 = 3-inch squares
This gives:
- Chess squares: 3″ × 3″
- No border
If you’d like a 1-inch border around the edge:
24 – 2 inches = 22 inches usable space
22 ÷ 8 = 2.75-inch squares
Using a tape measure to mark the measurements of where you wish the grid to be. Using a ruler or carpenter’s square, mark your grid in straight lines using a pencil. After you have your markings and are satisfied with the look of your chessboard, use painter’s tape to tape out the first direction of squares.
Allow the paint to dry completely, then follow the lines of the first rows of squares you have created and add fresh painter’s tape to make the other squares on the board.
Paint alternating squares:
□ ■ □ ■
■ □ ■ □


Once completely dry, remove all painter’s tape. Patio stones are usually not completely flat and tend to have a textured surface; as a result, you may need to touch up the paint. Using permanent acrylic paints, I mixed up a grey colour to match the original patio stone colour and touched up the white squares, creating a more refined straight line.
Step 3: Glue to the base & seal
Once this has dried completely, seal the surface with an outdoor sealer paint to protect it from the weather and outdoor elements. I used a clear spray paint sealer in a matte finish.
After this, use construction adhesive to glue the patio stone to the top of the cast-iron table. Apply the adhesive liberally to the top of the table and adjust the positioning until the patio stone is centred on top of the table.


Step 4: Differentiate the Two Teams
You want players to recognize pieces quickly. I chose to 3D print the pots to create the perfect size that would fit the 2 ¾” size squares. I did have to make a few prototypes until I was happy with the overall shape, size, and colour of the pot. I went with the traditional black and white colours for my plant pot chess pieces. Small terracotta plant pots would also work great if you do not have access to a 3D printer. *Tip: Your local library might have a 3D printer that you can use. Check your local library to see what’s available.
You can also paint small symbols on the pots:
- Crown for the king
- Queen symbol
- Cross for bishop
- Horse silhouette for a knight


Step 5: Plant the Chess Pieces
Fill each planter:
- Add a layer of drainage material if needed.
- Fill with Miracle-Gro® Cactus, Palm, and Succulent Potting Mix.
- Plant your selected cactus or succulent.
- Optional – Add decorative gravel on top. (The gravel gives a finished appearance and keeps soil from splashing during rain.)
Miracle-Gro® Cactus, Palm & Citrus Potting Mix features a fast-draining formula and is enriched with Miracle-Gro® Plant Food. This fast-draining formula is blended to help promote the successful growing of cacti, potted palms, citrus, and other succulents. This cactus potting mix is designed for indoor and outdoor container plants, including cacti, palm plants, citrus trees, and succulents.


Step 6: Arrange the Pieces
Set up the board as a standard chess layout.
Front row:
- 8 pawns
Back row:
- Rook
- Knight
- Bishop
- Queen
- King
- Bishop
- Knight
- Rook


Step 7: Care for Your Living Chess Set
- Water only when the soil is dry.
- Make sure the chess set is in a well-lit area so the plants can thrive.
- Rotate pots occasionally so plants grow evenly.
- Bring delicate plants indoors if the weather dips below freezing.
- Reapply outdoor sealer to the patio stone every season or two.
Finished Result
You’ll end up with:
✓ A functional outdoor chess board
✓ A living succulent and cactus display
✓ A decorative patio centrepiece
✓ A unique conversation starter that changes as the plants grow
The result feels part garden, part art piece, and part game table—something that looks just as good during a chess match as it does sitting quietly on the patio with coffee.
Thanks for reading! If you make your own living chess set, please tag @MiracleGroCanada, @PlantProjectCanada, and @OnceUponaBungalow. We would love to see your creations!
Until next time,
Happy gardening!
Shavonne.